For anyone involved in car sales or purchases, having a clear and accurate proof of purchase receipt is a necessity. It ensures transparency and legal protection for both parties. A well-designed template helps prevent any misunderstandings by clearly outlining the details of the transaction.
A reliable template should include the vehicle’s make, model, year, and VIN number, along with the buyer and seller’s contact information. Additionally, it’s important to specify the purchase price and payment method. Don’t forget to include the date of sale and signatures from both parties to validate the transaction.
By using a standardized template, you save time and reduce the risk of errors. Customize the document according to specific needs, but always ensure that it includes the key information necessary to complete the sale properly. A clear and professional receipt can serve as an important reference for both the buyer and the seller.
Here are the corrected lines without word repetition, preserving their meaning:
Provide the car make, model, and year of manufacture. Include the buyer’s full name, address, and contact details. Clearly state the sale date and total amount paid. Specify the payment method used for the transaction. Add the seller’s information, such as name and address. Indicate any warranty or guarantees offered with the vehicle. Mention any conditions or additional notes related to the sale.
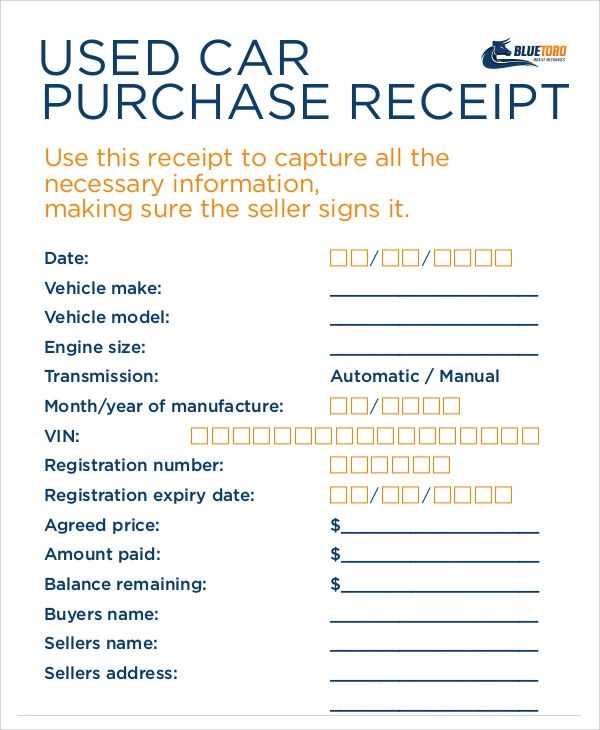
- Car Proof of Purchase Receipt Template
To create a car proof of purchase receipt, include the following key details:
- Buyer Information: Full name, address, and contact information.
- Seller Information: Full name, business name (if applicable), address, and contact information.
- Vehicle Information: Make, model, year, VIN (Vehicle Identification Number), and mileage at the time of sale.
- Transaction Details: Date of purchase, sale price, and payment method (e.g., cash, check, or bank transfer).
- Signature: Both buyer and seller signatures confirming the transaction.
This template ensures that all essential aspects of the sale are documented clearly. It serves as proof of ownership transfer and protects both parties in case of disputes.
Start by clearly identifying the buyer and seller. Include full names, addresses, and contact information for both parties. This ensures the document is traceable and both parties can be easily contacted if needed.
Include Vehicle Details

Next, provide the vehicle’s make, model, year, Vehicle Identification Number (VIN), and current mileage. This information guarantees that the vehicle is correctly identified and avoids confusion in case of disputes.
Specify Payment Information
Include the total price of the vehicle, any deposit paid, and the remaining balance. If applicable, note any financing arrangements or trade-in values. Clearly indicate the payment method used, whether cash, bank transfer, or check.
Ensure the invoice includes the date of the transaction and the signatures of both the buyer and seller. This confirms the agreement and provides legal validation.
Clearly state the date of purchase for proper tracking and reference. Include the vehicle identification number (VIN) to avoid any confusion with similar models. Specify the make and model of the car to establish exact details.
Provide the buyer’s full name and contact information to confirm ownership. List the seller’s name and contact details, ensuring the document is traceable. The purchase price should be clearly stated along with any applicable taxes or fees.
Include the method of payment to document the transaction method, such as cash, check, or credit card. Additionally, note any warranties or guarantees offered during the sale, including duration and coverage details.
Don’t forget the signature of both parties to authenticate the receipt and confirm agreement. Ensure there’s a statement of transfer of ownership to formalize the sale.
Focus on clear organization. Start with a clean layout using simple fonts like Arial or Helvetica. Avoid decorative fonts that could distract from the information.
Use Consistent Alignment

Align all text to the left for a neat and uniform look. Ensure headings are distinct and set apart from body text with larger font sizes or bold formatting. This helps readers easily navigate the document.
Include Clear Section Breaks

Use horizontal lines or extra space between sections to clearly define different areas of the receipt, such as the buyer’s and seller’s information, payment details, and the product description.
| Section | Tip |
|---|---|
| Header | Make it bold and larger in size to stand out. |
| Body | Use standard font size with easy-to-read spacing. |
| Footer | Include company contact details in smaller font. |
These formatting steps help ensure your receipt looks clean and professional, making it easier for customers to understand and retain the information provided.
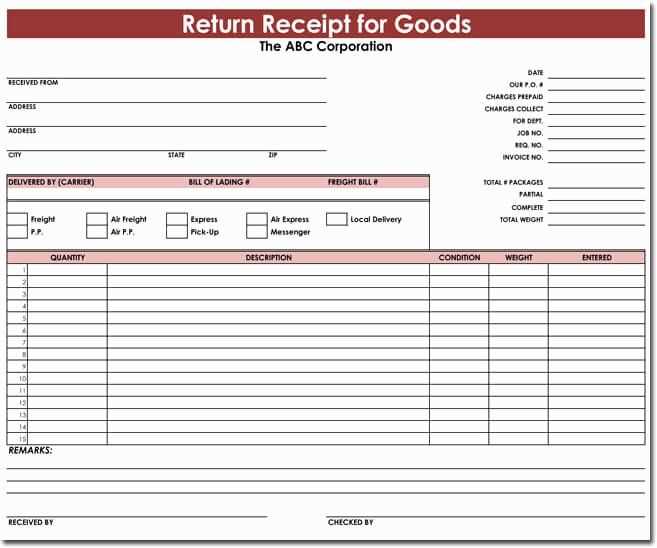
To ensure a receipt is legally valid, include the following key details:
- Seller’s Information – Name, business name, address, and contact details are crucial for identifying the seller.
- Buyer’s Information – If applicable, include the buyer’s name and contact details for traceability.
- Date of Purchase – Specify the exact date the transaction occurred. This helps determine the purchase’s legitimacy and timelines for returns or warranties.
- Item Description – Clearly list the purchased item(s) or service(s), including quantity, model number, and serial number if relevant. This helps verify the transaction and avoids confusion.
- Total Amount Paid – Include the full price, including taxes, and any discounts applied. Ensure this reflects the final amount after all adjustments.
- Payment Method – Indicate whether payment was made by credit card, cash, cheque, or another method. This helps verify how the purchase was completed.
Tax Compliance

Receipts should comply with local tax regulations, displaying the correct tax rate, and itemizing tax amounts separately if required by law. This ensures the receipt is acceptable for tax purposes.
Legal Obligations

Many regions require businesses to issue receipts for certain transactions, especially for warranty claims or refunds. Businesses must follow these rules to avoid penalties or disputes.
Ensure the template includes all necessary details, such as the buyer’s name, vehicle information, price, and payment terms. Omitting any of these crucial elements can lead to confusion or legal complications.
Cluttered Layout: A busy, overcrowded design can overwhelm the user. Keep the layout simple and organized. Use clear sections to separate important information, making it easy to read and understand.
Inaccurate or Vague Terms: Avoid using ambiguous language that could be misinterpreted. For example, clearly state the exact amount paid, the vehicle’s condition, and any warranties offered. Ambiguity can lead to disputes.
Font and Size Inconsistencies: Stick to one or two fonts and maintain consistent sizes throughout the template. Using multiple fonts or inconsistent sizes can make the document appear unprofessional and hard to follow.
Missing Legal Disclaimers: Include any necessary disclaimers regarding the transaction. Not adding terms about returns, repairs, or other legal obligations could leave both parties vulnerable to disputes.
Overcomplicating the Design: While it’s tempting to use decorative elements, avoid making the template too fancy. Prioritize clarity over design flair to ensure that the document serves its functional purpose effectively.
Adjust the receipt template based on buyer needs, ensuring all relevant details are covered for each transaction type.
- For Individual Buyers: Include fields such as the buyer’s full name, contact information, and the specific vehicle model. You can also add a “Personal Identification Number” section to validate the transaction for personal use.
- For Business Buyers: Add business name, registration number, and tax information. This ensures the purchase is properly recorded for corporate or tax purposes.
- For International Buyers: Incorporate space for international shipping details, such as customs declarations, currency conversion, and destination country regulations. Also, provide a clear section for VAT or tax exemptions if applicable.
- For Used Vehicle Transactions: Ensure sections are included for vehicle condition, previous ownership, and mileage. Add a “Vehicle History” field if the transaction involves pre-owned cars.
Tailoring the template in this manner ensures clarity and prevents confusion during audits or future reference. Adjusting fields specific to each buyer’s needs creates a smooth transaction process for both parties.
Use clear and simple bullet points to list key information about the car purchase. Ensure each item is concise and easy to understand, with no extra details. This structure helps recipients quickly grasp the most important elements of the transaction.
Include the date of purchase, car make and model, VIN number, and purchase price as the primary data points. Organize them logically so they are easy to find at a glance.
Provide a section for the seller’s details, such as name, contact information, and business address. This establishes clarity regarding who the receipt is from and provides contact information if needed later.
Ensure a clear breakdown of payment method(s) used, including cash, credit, or financing options. This helps avoid confusion about how the transaction was completed.
Include a signature line for the buyer and seller to confirm the transaction. A signature adds legitimacy and clarity to the agreement.
Make sure the document includes any applicable warranty or return policy details. Even a brief mention of terms can prevent future misunderstandings.