To streamline your business operations, use a purchase receipt template from suppliers. This template ensures accurate documentation and simplifies tracking of transactions between you and your suppliers. It includes key details such as the supplier’s contact information, date of purchase, and specific items purchased, which helps in managing inventory and financial records.
Customize the template by adding your company’s branding elements, such as your logo and contact details. This not only maintains professionalism but also makes it easier for your accounting team to reference purchases. Include sections for the item description, quantity, price per unit, total cost, and applicable taxes for transparency.
Make sure to review and update the template regularly to reflect any changes in your supplier relationships, payment terms, or tax regulations. Having a reliable, standardized template reduces human error and saves time, especially when handling large volumes of orders.
Here’s the corrected version:
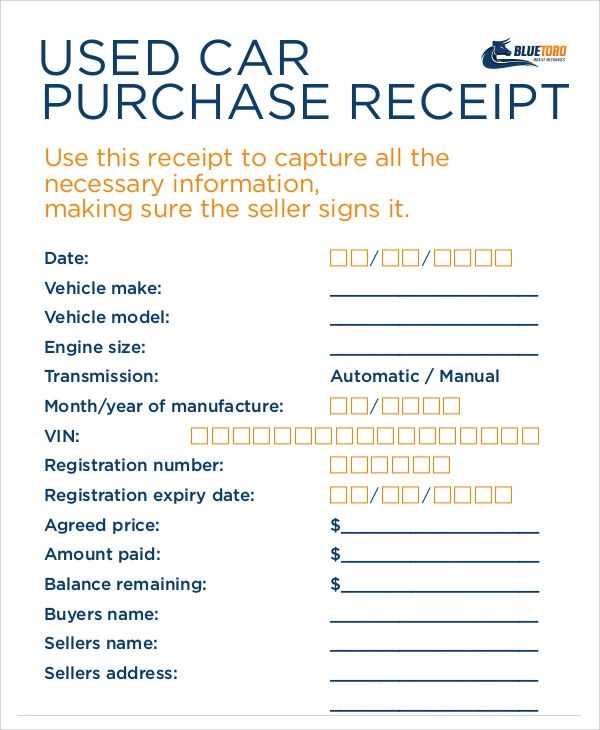
A purchase receipt template from a supplier must include specific elements to ensure it meets legal and accounting standards. Begin with the supplier’s name, address, and contact details at the top. This provides transparency and traceability. Include the date of purchase and a unique receipt number for record-keeping purposes.
Details of the Transaction

Next, list the items purchased. For each item, provide the description, quantity, unit price, and total price. This makes it easier to verify the transaction. If any discounts or taxes apply, indicate them clearly next to the total price. Always ensure the grand total reflects all adjustments accurately.
Payment Information

Clearly state the payment method used, whether cash, credit card, or bank transfer. If applicable, include the payment reference number. This section clarifies how the transaction was completed and provides evidence of payment.
End the receipt with your company’s terms and conditions, return policy, or any other necessary legal disclaimers. Keeping the template consistent across purchases ensures easier auditing and minimizes errors.
- Purchase Receipt from Supplier Template
To streamline your purchasing process, use a detailed and structured purchase receipt template. This ensures accuracy in documenting the items received from your supplier and helps you track inventory efficiently. A good template should include the following key elements:
Key Elements of a Purchase Receipt
1. Supplier Information: Include the supplier’s name, contact details, and address. This helps you confirm the source of the goods for future reference.
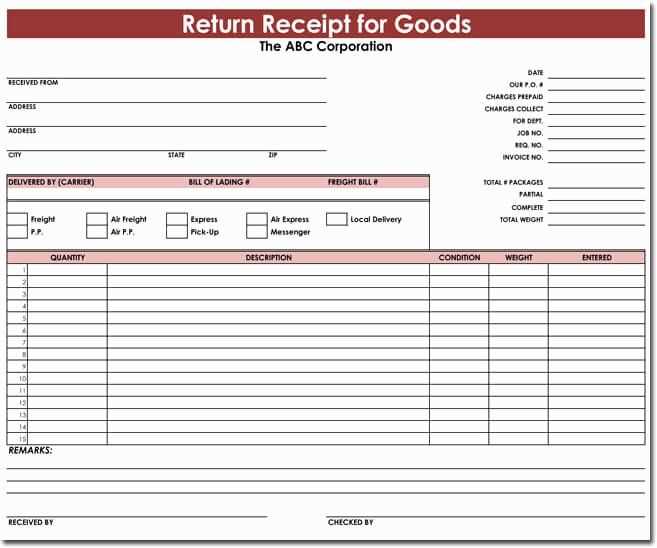
2. Receipt Number and Date: Clearly state the receipt number and the date when the goods were received. This is crucial for tracking and matching with purchase orders or invoices.
3. Itemized List: Detail each item received, including quantity, description, unit price, and total price. This will ensure that you receive the correct items and quantities as per the order.
4. Payment Terms: Specify payment conditions, such as due dates or discounts, to avoid confusion about billing and payment schedules.
Best Practices for Using the Template
Ensure that all fields are filled out accurately and legibly. Double-check the item list against the purchase order to avoid discrepancies. Store a copy of the receipt in both digital and physical formats for easy access and record-keeping. Keep track of receipts by organizing them chronologically for quick reference when needed.
Begin by identifying the core information your receipt needs to include. Ensure the template has placeholders for details like your company’s name, address, contact information, and a unique receipt number. This makes tracking and communication smoother.
Next, decide on the layout that suits your business. Align the sections in a logical order: supplier’s information at the top, followed by the purchased items, and ending with payment details. A clear separation between each section reduces confusion and enhances readability.
Customization for Your Brand

Make sure to customize the template with your business logo and colors. This not only strengthens your branding but also makes your receipts look more professional. Include any additional information relevant to your business, such as warranty policies, return instructions, or business hours, without cluttering the space.
Legal and Tax Compliance
Check local regulations to ensure your receipt includes any mandatory information, such as tax rates or registration numbers. This helps avoid issues with audits and keeps your business compliant with legal standards.
Lastly, test your template across different devices and printing methods. This ensures it remains clear and professional whether viewed on a phone or printed out for physical records. Make adjustments as needed to maintain a polished look across all platforms.
Begin with the supplier’s name, address, and contact details to confirm the identity of the source. This information should be clearly visible at the top of the receipt.
Next, include the receipt number and date of the transaction. This ensures easy tracking and verification in case of future inquiries or audits.
Provide a detailed list of items purchased, including quantities, unit prices, and the total cost for each item. This transparency avoids confusion and disputes about what was purchased.
The total amount due or paid should be clearly displayed, along with any discounts or adjustments that apply to the order. Specify whether the payment was completed or if there are outstanding amounts.
Include tax information, showing both the tax rate and the total tax amount for clarity on the breakdown of the total cost.
If applicable, mention any return or exchange policies, as well as warranty details, to ensure the buyer understands their rights and obligations regarding the purchased goods.
To tailor a receipt template for various suppliers, focus on key elements that reflect the specifics of each supplier’s products, branding, and payment terms. Adjust the template’s structure and fields to accommodate these variations effectively.
Start by incorporating the supplier’s logo and contact details prominently on the receipt. This helps maintain consistency with their branding. For suppliers with specific tax rates or discount structures, include separate fields to calculate applicable charges or reductions. Add a section for special instructions or delivery notes if the supplier regularly requires additional information for processing orders.
Custom fields for purchase order numbers, delivery terms, and payment methods can be adjusted depending on the supplier’s preferences. Some suppliers might need a unique reference code, while others may not. Incorporate dynamic fields to handle these customizations automatically based on the order data.
For suppliers with complex pricing models, like volume discounts, ensure that the receipt includes clear breakdowns of quantities, prices, and discounts applied. Tables are useful for displaying itemized details, ensuring clarity for both the buyer and the supplier.
| Item | Quantity | Unit Price | Total |
|---|---|---|---|
| Product A | 10 | $5.00 | $50.00 |
| Product B | 5 | $8.00 | $40.00 |
| Discount | – $10.00 | ||
| Total | $80.00 | ||
Make sure to tailor payment details, such as the bank account number or payment link, for suppliers that prefer specific methods. If suppliers provide different currency options, the template should reflect these currencies and include conversion rates where necessary.
Adjust the terms and conditions section to align with the supplier’s policies on returns, warranties, or customer service. This ensures that the receipt is legally binding and in line with the supplier’s requirements.
In summary, customizing a receipt template involves adjusting visual elements, fields, and functionality to meet the specific requirements of each supplier, ensuring clear communication and accurate documentation of transactions.
Repeating words have been replaced while keeping the meaning and structure of sentences.
Make sure your purchase receipt template includes only the necessary information. If the same words appear multiple times, it’s a good idea to simplify the phrasing while maintaining clarity. For example, instead of repeatedly using “received” and “goods,” consider adjusting the sentence structure or using synonyms. This reduces redundancy and enhances the overall readability.
Be Clear and Concise

For better comprehension, ensure each line on the receipt serves a specific purpose. Avoid overusing terms like “purchase,” “amount,” or “date.” You can replace them with more direct wording, such as “total,” “transaction,” or “purchase date.” Keeping the language straightforward prevents confusion and ensures that every detail stands out clearly.
Examples of Simplifying Repetitive Words

- Original: “The goods were received and the purchase was completed with the goods received in full.”
Revised: “The purchase was completed with full receipt of goods.”
- Original: “The total amount of the purchased goods is shown on the receipt.”
Revised: “The total for the purchased goods is on the receipt.”