Use a monthly rental receipt template to streamline your record-keeping process. It’s an effective way to provide tenants with clear documentation of their rental payments. This receipt serves as proof of payment, reducing the chances of disputes over missed payments or overcharges. It also ensures you stay organized when managing multiple properties.
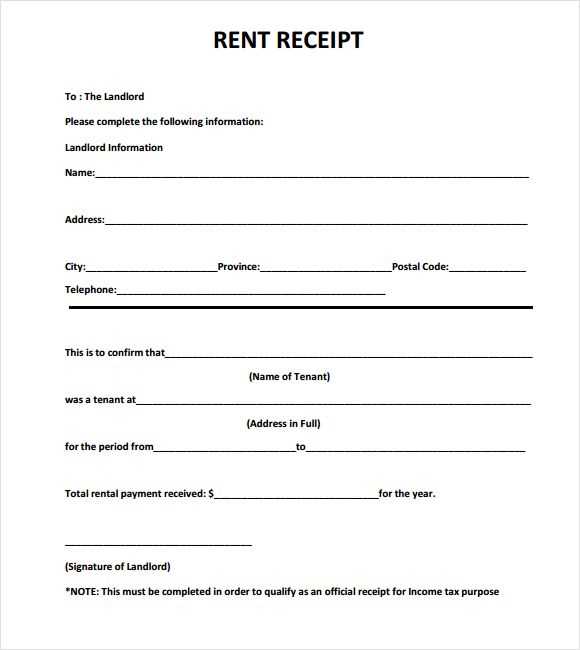
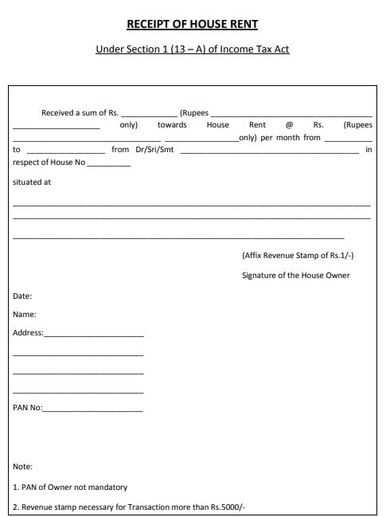
A well-structured rental receipt should include key details: tenant name, address of the rented property, amount paid, payment date, and rental period covered. If applicable, list any additional charges like late fees or utilities. Make sure to include a clear statement that confirms the transaction was completed, and leave space for both the landlord’s and tenant’s signatures.
Adopting a template can save time and help avoid errors. Customize it to suit your specific needs, whether you’re renting out a single unit or managing multiple properties. You’ll be able to issue receipts quickly, ensuring both you and your tenants have accurate documentation for future reference.
Here are the revised lines, with repetitions removed while maintaining the original meaning:
Start by clearly stating the rental period, the property address, and the amount paid. These are the core elements of a rental receipt. Ensure all amounts are written clearly, and include the payment method, whether it was by check, cash, or another form.
Key Details to Include

List the tenant’s name, along with the date of payment and the corresponding rental period. This allows for quick identification and reference. The signature of both parties (tenant and landlord) serves as confirmation of the agreement. Finally, ensure there is a statement confirming that the payment was received in full for that period.
Avoiding Repetition
Keep the language simple and straightforward. Instead of repeating “payment received” multiple times, use variations like “total paid,” “payment confirmed,” or “settled amount.” This will help avoid redundancy while conveying the necessary information effectively.
- Monthly Rental Receipt Template
A rental receipt should contain the following key details to be clear and legally binding:
- Receipt Number: Assign a unique number to each receipt for easy tracking.
- Landlord’s Information: Include the landlord’s full name, address, and contact information.
- Tenant’s Information: Provide the tenant’s full name and contact details.
- Property Address: Clearly state the address of the rental property.
- Payment Amount: Mention the exact amount paid for the rent.
- Payment Date: Record the date the payment was received.
- Rental Period: Specify the period that the rent payment covers (e.g., from March 1 to March 31).
- Method of Payment: Note how the payment was made (e.g., cash, check, bank transfer).
- Late Fees (if applicable): Include any additional fees for late payments if relevant.
- Landlord’s Signature: The landlord should sign the receipt for validation.
By ensuring all these elements are included, both the landlord and tenant have a clear and professional record of the transaction.
A rental receipt should provide clear and concise details about the transaction. Here are the key elements to include:
1. Tenant and Landlord Information

Include the full names and contact information of both the tenant and the landlord. This ensures that both parties can be easily identified and contacted if necessary.
2. Rental Payment Details
Specify the amount of rent paid, the payment date, and the rental period covered. If the payment was made via cheque, cash, or bank transfer, mention the payment method.
3. Property Information
Clearly state the address of the rental property being leased. This helps avoid any confusion with other rental agreements or payments.
4. Payment Breakdown
If there are additional charges, such as utilities, maintenance fees, or late fees, include these amounts separately from the base rent. This ensures transparency and clarity for both parties.
5. Receipt Number

Assign a unique receipt number for easy reference. This helps track payments, especially when managing multiple tenants or properties.
6. Signature
Include the landlord’s signature or an authorized representative’s signature to validate the receipt. This confirms that the payment has been officially received.
7. Terms and Conditions
If there are any specific terms related to the payment (e.g., late fees, rent increases), these should be included to avoid any misunderstandings in the future.
To format a rental receipt clearly and accurately, organize the key details into distinct sections. Here’s how:
- Header Information: Start with the name and contact details of the landlord or property manager. Include the business name, phone number, email, and address.
- Tenant Details: List the tenant’s name, address, and contact information to ensure identification.
- Rental Property Details: Specify the property address or unit number. This ensures there’s no confusion about which property the payment pertains to.
- Payment Information: Include the amount paid, the date payment was made, and the rental period (e.g., “From January 1 to January 31”).
- Payment Method: Indicate how the payment was made (e.g., cash, check, bank transfer) for transparency.
- Late Fees (if applicable): Clearly mention any late fees or penalties if the payment was delayed.
- Receipt Number: Assign a unique receipt number for tracking and record-keeping purposes.
- Signature (optional): While not always required, having the landlord or property manager sign the receipt adds credibility and formality.
By keeping this structure clean and straightforward, both parties can quickly verify important details, reducing the chance of misunderstandings.
Tailoring your receipt template for various payment methods ensures clarity and consistency in transactions. Adapt the layout and details based on the method used, ensuring all necessary information is included for each case.
For Credit or Debit Card Payments
- Include the last four digits of the card number for security purposes.
- Specify the card type (Visa, MasterCard, etc.) to distinguish payment methods.
- Note any processing fees or charges associated with card payments.
- Provide a confirmation or authorization number from the payment processor for verification.
For Cash Payments
- Indicate the exact amount paid and whether any change was given.
- Use a “Cash” label in the payment method section to differentiate it from digital transactions.
- Consider adding a statement confirming receipt of physical cash.
For Bank Transfers or ACH Payments
- Include the transaction reference number for tracking purposes.
- List the bank name or payment platform used for the transfer.
- Indicate the payment date and expected clearance time.
For Mobile Wallets (Apple Pay, Google Pay, etc.)
- Specify the mobile wallet service used for the transaction.
- Include a transaction ID or reference code unique to the mobile payment service.
- Optionally, display a QR code or confirmation message from the wallet app for verification.
Adjust the layout of your template by using separate fields for each payment method, ensuring that the most relevant information is clear. This customization not only helps streamline your record-keeping but also enhances the transparency and professionalism of each transaction.
Always double-check the accuracy of transaction details before issuing receipts. Missing or incorrect information, such as amounts, dates, or client names, can lead to confusion or disputes.
Ensure the receipt clearly identifies the payer. Using a generic “Customer” label is insufficient; always include the full name or company name of the person or business making the payment.
Avoid omitting the payment method. If the payment is made by card, check, or cash, specifying this helps clarify the transaction for both parties.
Do not leave out itemized lists. If the payment covers multiple services or products, provide a breakdown of each to prevent misunderstanding or questions later on.
Make sure you add the correct tax rate and amount if applicable. Many businesses overlook this, which can result in legal or financial issues down the line.
Finally, refrain from issuing receipts without clear terms. A receipt should outline the terms of the transaction, including any refunds, returns, or warranties that apply.
| Mistake | Consequence | Solution |
|---|---|---|
| Incorrect transaction details | Confusion and disputes | Verify amounts, dates, and names |
| Lack of payment method | Unclear payment records | Specify payment type |
| Missing itemized list | Disagreement over billed items | Break down each charge clearly |
| Omitting tax details | Potential legal issues | Include tax rate and amount |
| Vague terms of transaction | Confusion about refunds or returns | State clear terms for refunds or warranties |
Keep your rental receipts organized and accessible to streamline your tax process. Properly managing them can make tax filing much smoother and help you claim deductions accurately. Here are specific steps to follow:
- Store Receipts Digitally: Scan or photograph physical receipts and save them in a cloud storage system. Use a folder structure with clear naming conventions to keep everything easy to find.
- Organize by Month and Year: Group receipts into folders labeled by month and year. This helps you quickly locate documents when it’s time to prepare taxes.
- Track Rent Payments Regularly: Update your records monthly with the exact payment amount, date, and any relevant details. Use a spreadsheet or accounting software to log payments.
- Label Receipts with Additional Details: Include property address, tenant name, and the payment period for each receipt. This adds context, making it easier to reference later.
- Backup Your Records: Ensure you have backup copies in case of data loss. Use both cloud storage and physical backups like an external hard drive.
- Use Accounting Software: Consider using accounting or tax preparation software that integrates with your digital receipts. This can automatically generate reports and categorize expenses.
- Track Rent Increases and Lease Changes: Keep records of any adjustments to rent or lease agreements. Having these on hand helps during tax audits and ensures you don’t miss any important deductions.
Maintaining organized and accurate records of your rental receipts throughout the year will make tax filing simpler and reduce the risk of mistakes. Regularly updating and backing up your data ensures that nothing gets lost or overlooked.
For creating receipt templates, you can choose between free and paid tools depending on your needs. Free tools like Canva and Google Docs offer templates with easy customization options. Canva allows you to create visually appealing receipts with drag-and-drop functionality, ideal for those who need a quick, branded design. Google Docs also has templates that you can edit directly in your browser, offering a simple solution for basic receipts.
If you’re looking for more advanced features, paid tools like Adobe InDesign and Microsoft Word can be helpful. InDesign provides a higher level of control over design and layout, allowing you to create professional receipts with custom fonts and graphics. Microsoft Word offers more robust template options and allows for integration with payment tracking systems, making it suitable for businesses with recurring transactions.
For a balance of both, tools like Zoho Invoice and FreshBooks are great. They offer receipt templates along with invoicing and billing functionalities, which makes them ideal for small businesses that need streamlined operations. Zoho Invoice has a free version with basic features, while FreshBooks provides more advanced options through its paid plans.
Now words don’t repeat too often, but meanings are preserved.
For a clean and clear monthly rental receipt, keep the format simple and organized. Each section should serve a specific purpose, ensuring all important details are easy to find. Here’s a layout suggestion:
| Field | Description |
|---|---|
| Tenant Name | Include the full name of the tenant responsible for the rent payment. |
| Rental Property Address | Provide the full address of the rented property. |
| Amount Paid | Specify the exact amount received for the month. |
| Payment Date | Indicate the exact date the payment was made. |
| Landlord’s Information | Include the landlord’s name and contact details for clarity. |
| Receipt Number | Assign a unique number to each receipt for reference and tracking. |
Using this structure helps tenants and landlords track payments efficiently, making the process clear and reliable. For an added touch of professionalism, include your business logo or watermark.
Always ensure that the receipt is legible and accurate, with no missing or unclear details. Regular updates or improvements to the format based on feedback will keep things running smoothly.