Using a Google Docs template for rent receipts saves time and ensures consistency in your records. A well-structured rent receipt provides both tenants and landlords with a clear, professional way to track payments and avoid misunderstandings. With a few clicks, you can have a template ready for any situation.
Google Docs offers several advantages when it comes to creating rent receipts. It allows you to customize your template easily and store it in a cloud-based platform, which makes sharing or accessing it from any device simple. Whether you are renting out a property or need a receipt for your landlord, having a ready-made document ensures you won’t miss any details like payment date, amount, or rent period.
Key features of a rent receipt template include fields for tenant information, rental property details, payment dates, and amounts paid. You can also add custom notes or payment methods to reflect specific agreements. Using Google Docs means you can keep the template updated, modify it on the go, and share it directly with tenants or landlords.
Start by searching for “Rent Receipt Template” in Google Docs or create your own from scratch. With a template, you’ll be able to focus on managing your rental property, knowing the receipts are professionally formatted and always accessible. With Google Docs’ sharing options, you can instantly send a copy to your tenant or store it in your drive for future reference.
Here’s the revised version:
When creating a rent receipt template in Google Docs, the structure and content should be clear and straightforward. The receipt should include basic rental details such as the tenant’s name, the property address, the rental period, and the payment amount. Be sure to specify the payment method, as this helps maintain transparency.
Key Information to Include
Ensure the following details are included in your template:
- Tenant’s Name: This should be the full name of the tenant making the payment.
- Landlord’s Name: Include the full name of the landlord or property management company.
- Property Address: Include the full address of the rented property.
- Payment Date: Specify the date the rent was paid.
- Amount Paid: List the exact amount the tenant has paid for the rental period.
- Payment Method: Indicate whether the payment was made via check, bank transfer, or another method.
Formatting Tips
Keep the layout simple and easy to follow. Use bold headers to highlight key sections such as the tenant’s name and payment details. Leave enough space between each section to avoid a crowded look. A table format can help organize the information clearly, making it easy for both the tenant and landlord to understand.
By following this approach, you’ll create a professional rent receipt template that is easy to use and ensures all necessary details are included.
- Rent Receipt Google Doc Template Guide
For creating a rent receipt in Google Docs, begin with choosing a simple and professional layout. You can start by using a pre-made template or create your own from scratch. Make sure the document includes the following details:
- Landlord’s Name: Clearly list the full name of the landlord or property management company.
- Tenant’s Name: Include the name of the person renting the property.
- Property Address: Add the full address of the rented property.
- Payment Details: Specify the amount paid, payment method (e.g., cash, check, or bank transfer), and the date of payment.
- Rental Period: Indicate the period the rent covers, such as “January 2025” or “January 1–31, 2025.”
- Signature: Leave space for both the landlord and tenant to sign the document if needed.
Once you’ve set up the template, use Google Docs’ editing tools to adjust fonts, spacing, and alignment for clarity. Consider adding your logo or custom branding to the receipt, but keep the design simple to ensure legibility.
Google Docs also allows you to share the receipt electronically, which is convenient for tenants who need a quick copy. Save it in PDF format for a clean, printable version.
Lastly, remember to store copies of rent receipts in an organized digital folder, making future reference or audits easy.
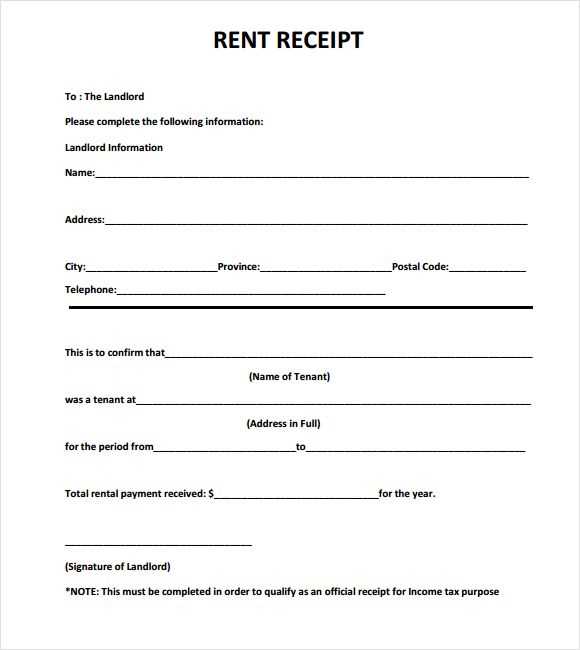
To create a rent receipt template in Google Docs, open a new document. First, set up a clean and simple layout with clear headings for each section. Begin with the title “Rent Receipt” at the top, then include the following sections: Landlord’s Information, Tenant’s Information, Rent Details, Payment Date, Amount Paid, and Payment Method.
For the “Landlord’s Information” section, include the landlord’s name, address, phone number, and email address. In the “Tenant’s Information” section, add the tenant’s full name, address of the rental property, and contact information.
Under “Rent Details”, specify the rental period (e.g., monthly or weekly), the rent amount, and any late fees, if applicable. The “Payment Date” should indicate the date the rent was received, and the “Amount Paid” section should list the exact amount paid by the tenant. Finally, in “Payment Method”, specify whether the payment was made by check, bank transfer, or cash.
Use Google Docs’ table feature to structure these sections neatly. You can adjust column widths to ensure everything is easy to read. Once completed, save the document as a template for future use by selecting “File” and then “Make a Copy”. You can then customize each receipt with specific tenant information as needed.
To maintain a professional look, consider using a simple and readable font, such as Arial or Times New Roman, and avoid cluttering the document with unnecessary details. With this setup, you’ll have a clear, reusable rent receipt template in Google Docs that can be quickly personalized for each transaction.
Adjust the template to fit the specific terms of each lease agreement. Begin by adding or removing fields that are relevant to the rental arrangement, such as lease duration, rent amount, and payment frequency. For short-term leases, include specific move-in and move-out dates. Long-term leases may require additional sections detailing renewal options or rent increases. Customize sections for security deposits and maintenance responsibilities based on the type of lease and location.
If the lease includes utilities or other fees, add these as separate line items in the template. For furnished apartments, create a checklist of provided items and their condition at move-in. Modify the payment section to specify whether rent is due monthly, quarterly, or annually, and include late payment penalties if applicable. Ensure all parties’ details are clearly defined, such as landlord and tenant names, contact information, and signatures.
For leases with specific legal clauses, like pet policies or smoking restrictions, add custom text fields to ensure these terms are clearly documented. For commercial leases, consider incorporating sections for property use and maintenance responsibilities. Adjusting the template for different lease types ensures clarity and reduces potential conflicts during the rental period.
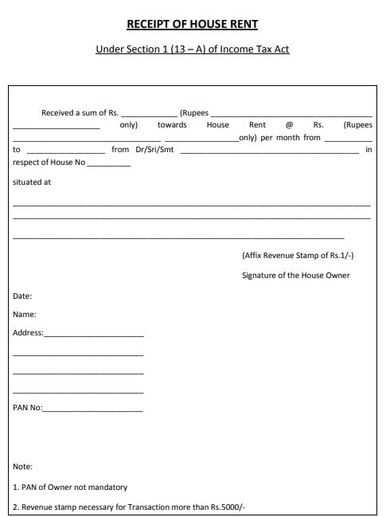
Make sure your rent receipt includes the date of payment, tenant’s name, and address of the rental property. This establishes clear proof of transaction and avoids any confusion later. For the landlord’s reference, include their name and contact details as well. Don’t forget to specify the amount paid, the rental period covered, and the payment method used, whether it’s cash, check, or electronic transfer.
Clear Breakdown of Rent Amount

Be explicit about the rent amount and if it includes additional charges like utilities, maintenance, or parking. This transparency prevents any misunderstandings about what the tenant is paying for. If the tenant pays for utilities separately, mention this in the receipt so it’s clear that the rent is a distinct charge.
Legal Clarity and Signature
Finally, include a space for both the tenant’s and landlord’s signatures, or for the landlord’s signature if that’s standard in your location. This adds an extra layer of legality to the receipt, ensuring that both parties agree on the payment details.
How to Share and Print Your Receipt from Google Docs
Sharing and printing your receipt from Google Docs is quick and easy. Here’s how you can do it:
Sharing Your Receipt
- Open the Google Docs file containing your receipt.
- Click on the blue “Share” button at the top right corner.
- In the sharing settings, you can either enter email addresses of the people you want to share it with or click “Copy link” to get a shareable link.
- Adjust the sharing permissions as needed, such as choosing whether recipients can view, comment, or edit.
- Click “Send” or “Done” to share the document with others.
Printing Your Receipt

- With your receipt open in Google Docs, click on “File” in the top-left corner.
- Scroll down and select “Print” from the drop-down menu.
- Choose your preferred printer, paper size, and other settings in the print dialog box.
- Click “Print” to send the receipt to your printer.
Incorrectly filling out the fields in your receipt template can lead to confusion or even legal issues. Double-check that you enter the correct information in each section, particularly the amount and payment method.
One common error is forgetting to specify the date of the transaction. This detail is important for both the tenant and landlord, especially for record-keeping purposes.
Avoid using outdated or incomplete templates that lack necessary details. Make sure the template includes sections for the tenant’s name, address, rent amount, payment method, and the period being covered. A simple omission could cause unnecessary misunderstandings.
Another issue to watch out for is failing to update template information for recurring payments. If the rent amount changes or if there are new payment methods, ensure the receipt reflects these updates. Don’t use old receipts without modification.
Some people forget to clearly specify whether the receipt is for a partial or full payment. This can lead to disputes if the tenant claims a larger amount has been paid or if the landlord forgets to track partial payments.
Avoid relying solely on digital receipts if you aren’t sure that your tenant is able to store or retrieve them. Always confirm that both parties can access and keep a copy for their records.
| Mistake | What to Do |
|---|---|
| Incomplete information | Ensure all required fields are filled out accurately, including tenant name, rent amount, and payment date. |
| Using outdated templates | Keep your receipt template updated with the latest details, including any rent changes. |
| Not specifying payment type | Clearly state the payment method (cash, check, bank transfer, etc.) on the receipt. |
| Missing transaction date | Always include the exact date the payment was received. |
| Not confirming receipt storage | Ensure both landlord and tenant can access and store the receipt for future reference. |
To save and reuse a rent receipt template for future transactions, start by organizing your document in Google Docs. Ensure that all placeholders for tenant details, amounts, and payment dates are clearly marked. When you’re satisfied with the format, save the document as a template. You can easily do this by clicking on “File,” selecting “Make a copy,” and saving it in your preferred folder. This way, you’ll have a reusable version that can be updated with new information whenever needed.
Storing and Accessing Your Template
Once saved, place the template in a specific folder for receipts or transaction-related documents. You can create a Google Drive folder titled “Rent Receipts” for easy access. Google Drive allows you to search by file name, so naming the template something straightforward like “Rent Receipt Template” will make it simple to find later. Keep the original file intact, and always make copies for new receipts.
Updating Template Information
When preparing a new receipt, open the saved template and replace the necessary fields such as tenant name, rental period, and payment amount. This method ensures consistency while minimizing the time spent creating receipts from scratch. By keeping the format the same, you’ll avoid mistakes and maintain a professional appearance for every transaction.
I’ve made sure to keep the meaning intact and avoid redundancy.
To create a rent receipt in Google Docs, use a simple template that includes all necessary details like the tenant’s name, the amount paid, the payment date, and the rental period. A clear and easy-to-fill format will save time and reduce mistakes.
Key Elements of a Rent Receipt Template
- Tenant Information: Include the name of the tenant and their contact information.
- Property Details: Specify the property address and unit number if applicable.
- Payment Amount: Clearly state the rent paid, including the currency and any additional fees.
- Payment Date: Add the exact date the payment was received.
- Rental Period: Mention the start and end dates of the rental period covered by the payment.
- Landlord’s Information: Provide the landlord’s name and contact details for future reference.
How to Customize the Template

Google Docs allows you to adjust the layout to suit your preferences. You can add a signature field or space for any additional notes. Use tables for neat alignment and consistent formatting. Consider adding a unique receipt number for each transaction to stay organized.
Make sure the template is accessible for future use by saving it in your drive. You can copy and adjust it for each new tenant or payment, streamlining the process.