Use a structured rent receipt template in Excel to track payments efficiently and maintain clear financial records. This method ensures that both landlords and tenants have a transparent history of transactions, reducing disputes and simplifying bookkeeping.
Customize the template by adding fields such as payment date, amount, tenant details, and payment method. Excel’s built-in formulas allow automatic calculations, making it easier to manage multiple receipts without manual errors.
To streamline the process, use preformatted cells for dates and currency values. Conditional formatting can highlight overdue payments, helping landlords stay organized. If needed, integrate drop-down lists for quick selection of payment methods and rental periods.
Save each completed receipt as a PDF for easy sharing. This ensures a professional presentation and prevents accidental modifications. For recurring tenants, create a template with auto-filled tenant details to speed up future transactions.
By leveraging Excel’s capabilities, you can maintain well-structured rent records with minimal effort. A well-designed template not only saves time but also improves financial clarity for both parties.
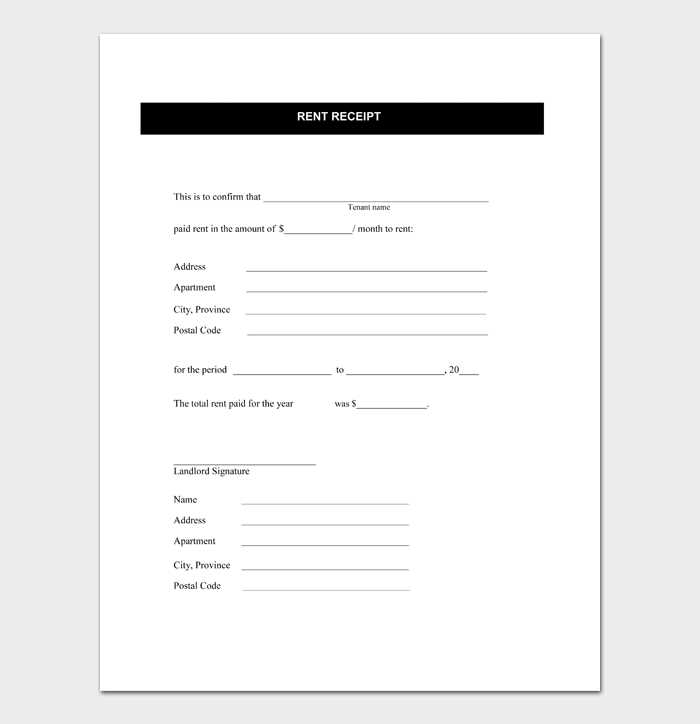
Rent Receipt Template in Microsoft Excel

Use Microsoft Excel to create structured rent receipts with automated calculations. Open a new workbook, set column headers for Date, Tenant Name, Property Address, Amount Paid, Payment Method, and Landlord’s Signature. Format currency fields for clarity.
Apply formulas to calculate totals automatically. Use =SUM(range) to add multiple payments and =TODAY() for the current date. Insert a checkbox for payment confirmation and format the sheet for easy printing.
Save as a template by clicking File > Save As and selecting Excel Template (*.xltx). This allows reuse without overwriting original data. Protect important cells by selecting them, right-clicking, and choosing Format Cells > Protection.
How to Structure a Rent Receipt in Excel
Use a clear table format with labeled columns for easy tracking. Include sections for the date, tenant’s name, rental address, payment amount, payment method, and receipt number. Add a signature field for validation.
Set column widths to ensure readability. Format the date column as “Short Date” and the amount column as “Currency” for consistency. Use “Data Validation” to create dropdowns for payment methods.
Apply simple borders to separate fields, making the receipt visually structured. Use the “Merge & Center” option for the title to improve clarity. Save the file as a template to reuse for future receipts.
Formatting Cells for Dates, Amounts, and Text
Ensure correct data entry by applying the right formatting for dates, amounts, and text. Use predefined Excel formats to maintain consistency and improve readability.
Configuring Date Formats
Select the date column, press Ctrl + 1, and choose Date. Pick a format that matches your region, such as MM/DD/YYYY or DD/MM/YYYY. If custom formatting is needed, use Custom and enter YYYY-MM-DD for an ISO-compliant style.
Applying Currency and Number Formatting
For monetary values, highlight the amount column, open Format Cells, and choose Currency or Accounting. Select the appropriate currency symbol and decimal places. To separate thousands, enable 1000 Separator (,). If numbers should display without currency symbols, use the Number format.
| Data Type | Recommended Format |
|---|---|
| Date | YYYY-MM-DD or MM/DD/YYYY |
| Currency | $1,234.56 (Currency) |
| Plain Number | 1,234 (Number with separator) |
For text entries, use the General format to prevent Excel from misinterpreting numbers as dates. If a leading zero is required (e.g., ZIP codes), set the format to Text. This ensures values like 01234 remain unchanged.
Using Formulas to Automate Calculations

Use =SUM(range) to total payments automatically. Select a column with payment amounts, apply the formula, and Excel updates the total whenever new entries are added.
For due balance, subtract received payments from the total amount. Use =B2-C2 (where B2 is the total rent and C2 is the amount paid). Drag the formula down to apply it across multiple rows.
Calculate late fees with a conditional formula: =IF(D2>TODAY(),0,B2*0.05). This checks if the due date (D2) has passed and applies a 5% fee if overdue.
To automate receipt numbers, use =ROW(A1). This assigns a unique number to each row, ensuring every receipt remains sequential.
Format calculations dynamically with conditional formatting. Highlight overdue balances by selecting a range, then setting a rule: Format cells where value > 0 to display in red.
By integrating these formulas, your rent receipt template stays accurate with minimal effort.
Adding a Printable Layout for Physical Copies
Adjust column widths to ensure all text fits within the page margins. Set uniform font sizes for clarity, and use bold text for key details like names, dates, and amounts.
Enable gridlines or borders around each section to separate fields clearly. Avoid excessive colors–stick to black and grayscale for readability on all printers.
Go to Page Layout and select Print Titles to keep headers visible on each printed page. Adjust margins and scaling in Print Preview to avoid cut-off content.
Save a PDF version by selecting File > Save As > PDF. This ensures formatting stays consistent when sharing or printing later.
Protecting and Locking Cells to Prevent Editing
Lock specific cells by selecting them, right-clicking, and choosing Format Cells. In the Protection tab, check Locked, then click OK. This marks the cells as locked but does not apply protection yet.
Enable sheet protection
Go to the Review tab and click Protect Sheet. Set a password if needed and choose what actions users can perform. Click OK to activate protection.
Allow editing in specific cells
If some cells should remain editable, highlight them before enabling protection. Open Format Cells, uncheck Locked, and apply sheet protection as described above.
To remove protection, return to the Review tab and click Unprotect Sheet. Enter the password if required.
Saving and Sharing the Template in Different Formats
To save your rent receipt template in Microsoft Excel and share it efficiently, follow these steps to ensure compatibility and convenience.
Saving the Template

Start by saving your template in different formats for varied uses:
- Excel Workbook (.xlsx): This format is ideal for maintaining editable cells and formulas. Save it as a workbook to keep all functionality intact for future updates or modifications.
- Excel 97-2003 Workbook (.xls): Use this format when sharing with users who may have older versions of Excel. It supports fewer features but ensures compatibility across older platforms.
- PDF (.pdf): If you need a non-editable version for sharing with tenants or others, save the template as a PDF. This preserves the layout and design while preventing unauthorized changes.
- CSV (.csv): For those who require the data in a simplified, comma-separated format (like for importing into another program), save the template as a CSV file. Keep in mind that CSV files do not preserve formatting or formulas.
Sharing the Template
After saving your file in the desired format, consider these methods to share it efficiently:
- Email: Attach your file directly to an email. PDFs and .xlsx files are most common for email attachments due to their versatility and widespread use.
- Cloud Services: Use platforms like Google Drive, Dropbox, or OneDrive to upload and share the file. Share a direct link with others for easy access and collaboration.
- File Sharing Apps: For large files, use file sharing tools like WeTransfer or similar apps to send templates securely.
- USB Drive: For offline sharing, copy the file to a USB drive and distribute it physically if necessary.