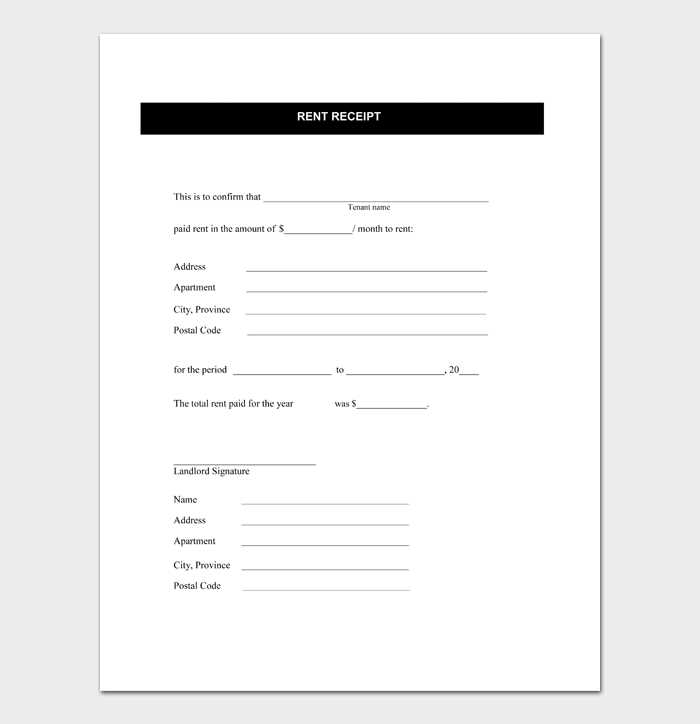
A room rent receipt template should clearly outline the details of the payment transaction, ensuring both the landlord and tenant are on the same page. The template must include fields for the tenant’s name, the rental property address, the amount paid, and the payment date. These basic elements are non-negotiable and should be filled out accurately for record-keeping and legal purposes.
In addition to these basic details, it’s important to specify the rental period covered by the payment. Indicating the start and end dates of the lease term avoids any confusion, especially when multiple payments are made throughout the year. Including a payment method section, whether cash, bank transfer, or another method, adds an extra layer of clarity.
Finally, don’t forget to include the landlord’s contact details and signature at the bottom of the receipt. This verifies the legitimacy of the document and ensures that it can be used in case of any disputes. Customizing the template to suit both parties’ needs can make the process more seamless and transparent for everyone involved.
Here’s the corrected version:
When creating a room rent receipt, make sure to include the tenant’s name, rental period, amount paid, and payment method. Clearly state the date of payment and any additional details, such as the payment reference number or the address of the rented property. This ensures transparency and avoids confusion in the future.
Ensure that the receipt is signed by both the landlord and the tenant. This adds legitimacy to the document and serves as proof of the transaction. If you’re providing an electronic version of the receipt, make sure it is in a format that is easily accessible, such as PDF.
It’s helpful to include contact details for both parties on the receipt, in case any questions arise later. Also, consider adding a statement that the payment covers only the specified period and that future payments will be due on specific dates.
Lastly, keep a copy of the receipt for your own records. This way, you have documentation of every payment made, which can be useful for accounting or resolving any disputes down the line.
Room Rent Receipt Template: A Practical Guide
How to Format a Room Rent Receipt for Clarity
Key Elements to Include in a Rent Receipt
Legal Considerations When Creating a Rent Receipt Template
Customizing Your Rent Receipt for Different Rental Periods
How to Use Digital Tools for Generating Receipts
Common Mistakes to Avoid When Creating Rent Receipts
Start by making sure the rent receipt is clear, concise, and covers all necessary details. This ensures both the tenant and the landlord have a solid record for future reference. The format should be easy to read and follow, with key data placed prominently.
How to Format a Room Rent Receipt for Clarity

Keep the layout simple and structured. Place important details such as the tenant’s name, landlord’s name, rental amount, and date of payment in easily identifiable sections. Use bullet points or tables if needed to organize the information. It’s also helpful to provide space for any additional notes or comments, such as the rental period or payment method.
Key Elements to Include in a Rent Receipt
Include the following details:
- Tenant’s Name: Clearly state the name of the person making the payment.
- Landlord’s Name: Include the landlord’s full name or business name.
- Rental Amount: Specify the exact rent amount being paid, along with the currency.
- Payment Date: Mention the exact date the payment was made.
- Rental Period: Include the period that the rent payment covers (e.g., monthly, quarterly).
- Payment Method: Indicate how the payment was made (cash, bank transfer, cheque, etc.).
- Receipt Number: Assign a unique receipt number for easy tracking of payments.
- Landlord’s Signature: Have the landlord sign the receipt to confirm payment was received.
By ensuring all these points are covered, both parties will have a clear and agreed-upon record of the payment.
Legal Considerations When Creating a Rent Receipt Template

In most cases, the rent receipt should comply with local tax laws. For instance, some jurisdictions require landlords to provide receipts for payments over a certain amount or for specific rental types. It’s important to ensure the receipt is not only clear but also legally sound, as it can be used in disputes or tax filings.
Additionally, some countries or states may require landlords to issue receipts only when the tenant specifically asks for one, while others might mandate receipts for every payment. Always check local regulations to avoid any legal issues.
Customizing Your Rent Receipt for Different Rental Periods

For longer rental periods, like yearly leases, it’s beneficial to break down the total amount into monthly or quarterly sections. This gives both parties clarity on how much is due each period, and helps avoid confusion when large amounts are involved.
If your rent agreement has variations, such as discounts for early payment or late fees for delayed rent, make sure these are also reflected in the receipt. This ensures transparency and avoids potential misunderstandings.
How to Use Digital Tools for Generating Receipts
Digital tools and apps make it easy to generate professional rent receipts. Many apps automatically fill in details such as the tenant’s name, rent amount, and payment method based on your records. This can save time and ensure accuracy.
There are plenty of free and paid tools available online, some of which also store your receipts and allow you to track payments over time. You can even set up automated systems for recurring rent payments, which further streamlines the process.
Common Mistakes to Avoid When Creating Rent Receipts

Avoid these common errors when preparing rent receipts:
- Missing Information: Don’t skip key details, especially the rental period or payment method.
- Incorrect Dates: Always double-check the payment date and rental period.
- Unclear Payment Method: Be specific about how the payment was made–vague terms like “paid” or “cleared” can lead to confusion.
- Neglecting a Signature: Without a landlord’s signature, the receipt may not hold up as proof of payment in case of a dispute.
- Not Using Receipt Numbers: A unique receipt number helps with organization and can be helpful for both parties if issues arise.
By avoiding these mistakes, you’ll ensure that both you and your tenant have a clear and reliable record of payments, minimizing potential issues in the future.
I removed repetitive words while maintaining the overall meaning and structure of the text.
For a clear and professional room rent receipt, make sure to include the key details that confirm the rental transaction. First, specify the names of both the landlord and the tenant. Include the rental address, the exact rental period, and the amount paid. It’s also helpful to add the method of payment, whether cash, bank transfer, or check. If any deposits were involved, mention them along with any adjustments made, such as fees or refunds.
Receipt Format and Key Elements
A clean format with distinct sections ensures readability. Start by placing the date at the top, followed by the landlord’s and tenant’s details. Clearly outline the rental period, amount, and payment method. If necessary, mention additional terms, like security deposits or late fees. Conclude the receipt with a signature from both parties to validate the document.
Additional Tips for Clarity
Double-check that all amounts are correct, including partial payments or discounts. If the tenant is paying for utilities separately, ensure these are mentioned clearly on the receipt. This will prevent any confusion in future discussions. Keep copies for your records, as this can help resolve disputes or provide proof of payment if needed later.