For a well-organized and professional receipt system, a restaurant receipt template can be a valuable tool. It streamlines the process of generating bills for customers, ensuring clarity and consistency. Use a template that includes the restaurant name, address, contact details, and space for itemized purchases. This minimizes confusion and makes transactions smoother for both staff and guests.
A good template should also have predefined sections for tax, tips, and totals, as well as the option to customize items for specific menu offerings. This reduces the need for manual calculation, speeding up the checkout process. Clear itemization of charges not only improves accuracy but also helps customers understand their expenses without questions at the point of sale.
Consider implementing a template that accommodates both small and large orders, and that adjusts based on the number of items being purchased. Incorporating an intuitive layout makes it easy for servers to input data quickly, reducing time spent on each transaction. Always test your template to ensure it works across different devices and printers for smooth printing and customer interaction.
Here’s the corrected version:
Ensure the layout is clean and user-friendly. Group related items together–drinks, appetizers, main courses, and desserts–so customers can quickly navigate the receipt. Use clear headings and ensure that the font size is readable, especially for important details like totals and taxes. Be mindful of space; don’t clutter the receipt with unnecessary information. Include the restaurant’s logo and contact details for brand consistency and customer convenience.
Highlight any special offers or discounts directly under the subtotal, making sure they stand out without overwhelming the rest of the information. Display the payment method at the bottom for clarity. Keep the formatting consistent, using alignment and spacing effectively to make the receipt easy to read from top to bottom.
Lastly, consider adding a small thank-you note at the bottom to leave a positive impression on the customer. This small touch can improve the customer experience without adding too much to the design.
- Receipt Restaurant Template
A well-designed receipt template is key for restaurants to ensure clear, professional, and organized transactions. Choose a clean layout that includes all necessary details like restaurant name, address, phone number, date, time, order items, prices, and totals. This creates an easy-to-read receipt that your customers will appreciate.
For an optimal template, keep item descriptions concise, aligning with the typical menu layout. Break down prices clearly, including taxes and tips, if applicable. The total should stand out to avoid confusion, and any additional information, such as discounts or loyalty program details, should be clearly noted at the bottom.
Integrate your logo and brand colors to personalize the receipt and maintain a cohesive brand identity. The footer is an ideal place for promotional messages or a thank-you note, encouraging customers to return.
Keep the font legible and ensure the text size is easy to read. Avoid cluttering the receipt with unnecessary elements that could detract from the most important details.
Opt for a format that clearly communicates key details. This includes the restaurant’s name, address, phone number, and the date and time of the transaction. The total amount, including tax and tip, should be easy to spot, along with itemized charges for transparency.
Itemization and Clear Layout

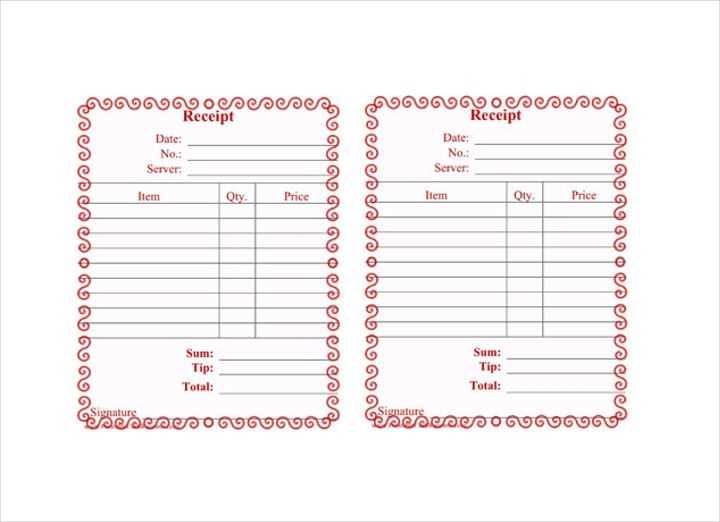
Ensure that each item is listed with its description, quantity, price, and any applicable modifiers (like special requests). Use a simple, organized layout, with sections for food, beverages, and additional services (e.g., delivery, gratuity). This allows customers to quickly review what they’ve been charged for.
Easy-to-Read Fonts and Size
Choose legible fonts and an appropriate size to avoid confusion. Fonts like Arial or Helvetica are clean and easy to read, while making sure that the font size remains consistent. The receipt should be structured with logical groupings, making the information straightforward to interpret.
Consider adding a space for a thank-you message or an invitation to leave feedback, but keep this concise to avoid clutter. Finally, incorporate a signature line for when necessary to confirm any particular instructions or special agreements. A clean, structured receipt makes the transaction clear and professional.
Choose colors that represent your restaurant’s theme and atmosphere. If your space has a warm, inviting vibe, opt for earthy tones or soft neutrals. A bold, modern restaurant might benefit from more striking color contrasts or metallic accents. Make sure the color scheme aligns with your logo and other visual elements.
Typography and Font Choices
Select fonts that match your restaurant’s style. A fine dining restaurant might choose elegant serif fonts, while a casual eatery can opt for modern sans-serif. Ensure the fonts are legible and consistent throughout the receipt layout to maintain clarity and cohesion.
Incorporate Logos and Icons
Position your logo in a prominent but not overwhelming spot. This helps customers immediately associate the receipt with your brand. If you use specific icons or imagery in your decor or marketing materials, include them in the receipt layout to create a seamless connection between your branding and the customer experience.
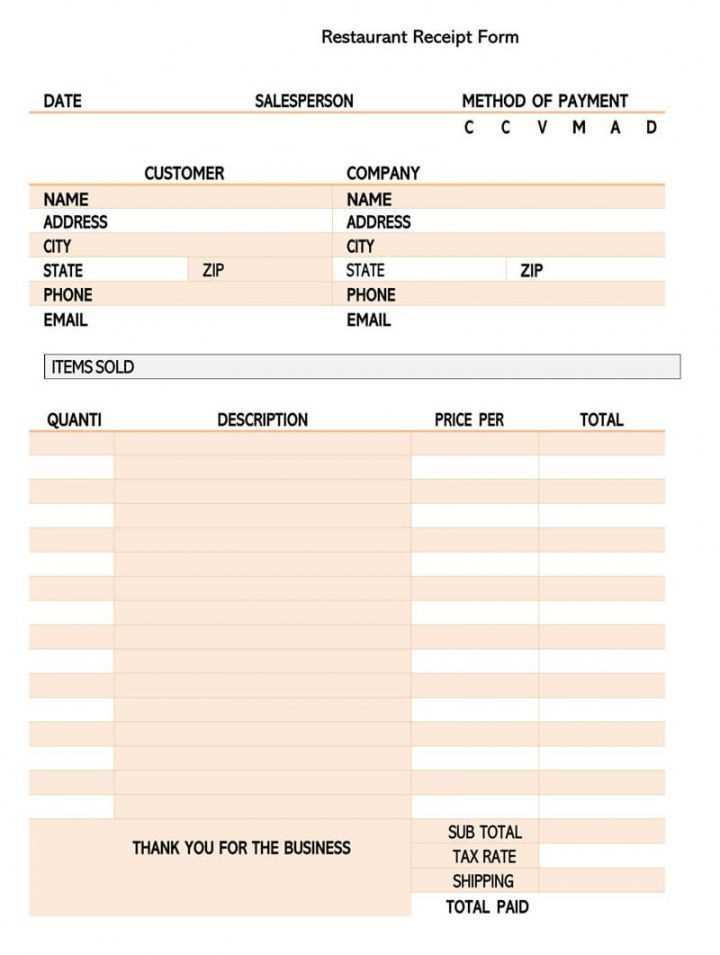
Ensure the receipt contains the restaurant’s name, address, and contact details, including the website if applicable. Clearly display the date and time of the transaction for reference. List the items ordered, along with their quantities and prices, as well as any applicable taxes or service charges. Show the total amount due and the method of payment used, whether it’s cash, card, or digital payment. If a tip is included, specify the amount. Include a unique transaction or receipt number for tracking purposes. Always provide a clear breakdown of charges to avoid confusion.
Choose the right paper size and margins based on your printer’s specifications. Ensure that the template matches the print area of your device to avoid cut-off text. Set font sizes and styles that are readable on small receipts, using standard characters like ASCII to guarantee compatibility.
Use standard encoding formats such as UTF-8 for better compatibility with different receipt printers and software. Check whether your printer supports graphics or logos and, if so, include high-contrast images for clearer prints.
Adjust the layout to include only necessary information, keeping the design compact and easy to read. Avoid long lines of text and break content into sections for better readability.
Test your receipt template on multiple printers and software setups, accounting for variations in print speed, paper size, and connection types. Use configuration settings to fine-tune margins, fonts, and alignment for different models.
Ensure compatibility with POS (Point-of-Sale) systems by verifying that your receipt template works seamlessly with widely-used software such as Square, Lightspeed, or custom solutions. Regularly update the software and firmware of both the printer and POS system for smoother operation.
Prioritize simplicity in your design to allow customers to quickly process information. Clear labeling of items, prices, and totals minimizes confusion. Use fonts that are easy to read and avoid overcrowding the receipt with unnecessary details. The layout should allow the customer to instantly grasp what they are being charged for and how much they owe.
Key Elements for Clarity
Include key details like item descriptions, quantities, and prices in a straightforward format. Keep the item names concise but descriptive enough for recognition. Group similar items together to reduce the cognitive load. Show subtotal, taxes, and discounts clearly, so the customer doesn’t have to search for them.
Efficient Transaction Flow

Design the receipt to reflect the transaction process from start to finish. Use logical sequencing, such as listing items from top to bottom in the order they were ordered or served. This layout allows customers to quickly verify their purchase. Consider using bold or larger fonts for totals to ensure they stand out immediately.
| Item | Quantity | Price | Total |
|---|---|---|---|
| Cheeseburger | 1 | $5.99 | $5.99 |
| Fries | 1 | $2.49 | $2.49 |
| Tax | – | – | $0.83 |
| Total | – | – | $9.31 |
Use minimal colors to maintain focus and avoid overwhelming the customer. Simple, professional color schemes, like black text on a white background, enhance readability. Add an area for tips or payment methods at the bottom, making the process smoother.
Follow these key steps to ensure your restaurant’s receipt template aligns with local tax and regulatory requirements:
- Verify tax rates: Research and implement the correct tax rates for food and beverage items in your region. This includes sales tax, value-added tax (VAT), or other applicable taxes.
- Display tax breakdown: Clearly show the tax amount on the receipt, breaking it down for customers to see how much they are paying for taxes.
- Incorporate required information: Include all mandatory details, such as your restaurant’s name, address, and business identification number (TIN), as required by local laws.
- Ensure itemized pricing: List individual items and their prices, making sure all products and services sold are accurately reflected.
- Include proper date and time: Most jurisdictions require the receipt to show the exact date and time of the transaction for record-keeping and auditing purposes.
- Handle discounts and promotions correctly: If offering promotions, ensure the receipt shows clear documentation of any discounts or special offers applied to the transaction.
- Implement digital records: Many areas require digital storage of receipts for tax purposes. Consider keeping electronic copies of all receipts for easy access during audits.
Regularly review and update your template to remain compliant with any changes in regulations. Consult with a local tax expert or accountant if needed.
Tips for Creating a Restaurant Receipt Template

A well-organized receipt template helps customers and staff keep track of orders efficiently. Keep your receipt layout clear and concise by following these tips:
- Ensure the restaurant’s name, address, and contact details are prominently displayed at the top.
- List the items ordered with clear descriptions and prices, making sure they are easy to read.
- Include the tax amount and total in separate lines for transparency.
- Provide a space for any discounts or promotions that were applied to the order.
- Make sure the payment method is listed (e.g., cash, card, etc.).
- Add a section for the date and time of the transaction to ensure proper record-keeping.
- Leave room for a thank-you message or a feedback request to show appreciation to your customers.