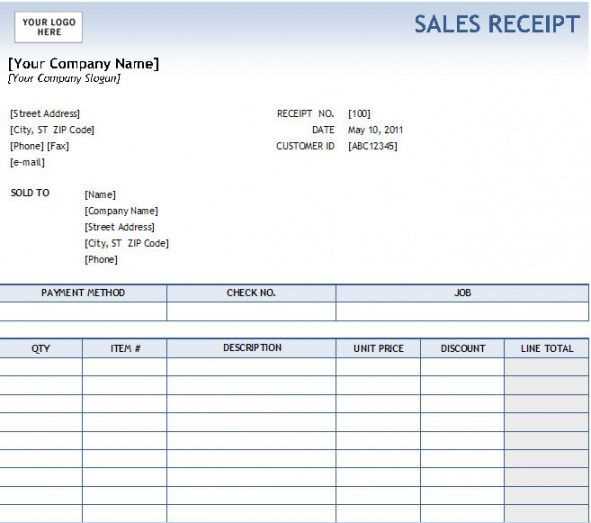
Creating a sale receipt template in QuickBooks Online allows you to streamline your invoicing process. First, open QuickBooks Online and log into your account. Navigate to the Gear icon in the top right corner, then click on “Custom Form Styles.” From here, select “New Style” and choose “Sales Receipt” as the type of form you want to customize.
Next, you’ll be directed to the template editor where you can modify your sales receipt’s layout. You can add or remove fields like customer information, product details, taxes, and payment methods. Adjust the font, colors, and logo placement to reflect your brand’s identity. Make sure your contact details and business name are clearly visible at the top of the receipt.
Once you’ve made your adjustments, preview the template to ensure it looks professional and meets your needs. You can also save the design for future use. After saving, apply the template to any sales receipt you create in QuickBooks Online, giving your transactions a personalized touch while maintaining consistency.
Here is a revised version of your text with reduced repetition of words:
To create a sales receipt template in QuickBooks Online, begin by selecting the “Sales Receipts” option under the “Custom Form Styles” section. This will allow you to either create a new template or modify an existing one. Choose a style that best suits your business needs, such as a simple or detailed format.
Next, customize the fields included in the template. You can add or remove details like customer information, product descriptions, and payment terms. Adjust the layout, fonts, and colors to align with your branding. QuickBooks allows you to preview the changes before finalizing the template, ensuring it matches your preferences.
If needed, add custom messages to the receipt, such as a thank-you note or specific terms for future purchases. This helps to personalize the receipt and provide additional value to your customers. Once satisfied with the design, save the template for future use. Now, every sales receipt you generate will reflect the custom format you created.
- How to Create a Sales Receipt Template in QuickBooks Online
To create a custom sales receipt template in QuickBooks Online, follow these steps:
1. Access Custom Form Styles

Go to the Gear icon in the top right corner of the QuickBooks dashboard and select “Custom Form Styles” under the “Your Company” section.
2. Choose “New Style” and “Sales Receipt”
Click on the “New Style” button, then choose “Sales Receipt” as the type of form you want to customize. This will open a new template for editing.
3. Modify the Template Layout

Within the form editor, you can adjust the layout by selecting a template style that fits your business. QuickBooks provides several default options, including standard, modern, and classic styles. Pick one that aligns with your brand’s look and feel.
4. Add Your Logo and Branding
Customize the template further by adding your company logo. Click the “Edit” button in the header section and upload your logo to make the receipt match your business’s branding.
5. Adjust the Information Fields
Decide which fields to include on the sales receipt. You can add or remove fields like terms, payment method, and sales rep information. QuickBooks allows you to drag and drop fields to rearrange them as needed.
6. Customize Colors and Fonts
Adjust the color scheme and font style to reflect your business identity. Use the design options provided in the editor to ensure the receipt is visually consistent with your branding.
7. Preview and Save
Once you’re satisfied with the design, preview the sales receipt to ensure everything looks correct. After reviewing, click “Save” to finalize your custom template.
8. Use Your New Template
To use your newly created template, simply select it when generating sales receipts. This template will automatically apply to all future sales receipts you create in QuickBooks Online.
Customizing your sales receipt template helps provide a professional and branded experience for your customers. QuickBooks Online makes it simple to personalize receipts to fit your business needs.
To create custom sale receipt templates in QuickBooks Online, you need to first ensure your account is properly set up for customization. Follow these steps:
1. Access Your QuickBooks Online Settings
Log in to your QuickBooks Online account. Once you’re on the dashboard, navigate to the gear icon in the top right corner. Click on it to open the Settings menu.
2. Go to Custom Form Styles

Under the “Your Company” section in the settings menu, click on “Custom Form Styles.” This is where you can manage and create custom templates for invoices, sales receipts, and other forms.
After accessing the “Custom Form Styles” section, you can either choose to modify an existing template or create a new one. Click on “New Style” and select “Sales Receipt” from the list of form types. This will allow you to design your template to meet your business needs.
Open QuickBooks Online and go to the “Sales” section from the left-hand menu. Select “Sales Receipts” under the “Transactions” tab.
Click on the “Customize” button at the top right corner of the page and choose “Create New Template.” You’ll be prompted to name your template for easy reference.
Customize the layout by selecting the sections you want to include, such as the company logo, customer information, and item details. You can drag and drop fields to adjust their placement or remove any sections that aren’t needed.
Use the “Header” and “Footer” options to add additional details like payment terms, contact information, or custom messages. QuickBooks allows you to preview the changes as you go, so take advantage of this feature to ensure everything appears as you intend.
To modify the design further, explore the available color schemes, fonts, and border styles. Make sure the template matches your brand and looks professional.
After finalizing your changes, save the template. It will now be available for use when creating new sales receipts, making the process quicker and consistent each time.
Customize the appearance of your sales receipt by adjusting layout settings and adding your brand’s personality. QuickBooks Online provides several tools to make this process seamless and straightforward. Here’s how you can tailor the design of your sales receipt template:
Adjusting the Layout
Begin by selecting the most suitable template from QuickBooks Online’s pre-designed options. Once you’ve chosen a basic layout, focus on positioning key elements like the logo, customer details, and payment information. Move these fields to areas that align with your business style. You can also choose between a simple or detailed layout depending on how much information you want to display.
Adding Branding Elements
Include your logo, color scheme, and fonts to reinforce your brand identity. QuickBooks allows you to upload your company logo directly onto the receipt, and you can select colors that match your branding. Custom fonts can be used to match your business style, ensuring that your sales receipts align with your marketing materials and provide a consistent customer experience.
Design Tips
Ensure clarity by keeping the design clean and easy to read. Avoid overcrowding the receipt with too many elements. Opt for a minimalist approach where only the necessary information stands out. The focus should be on making the receipt user-friendly and professional.
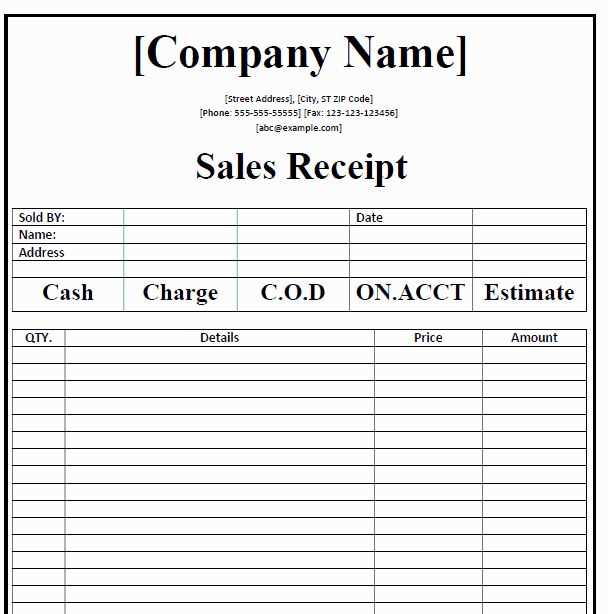
Using Tables for Organized Information
Organize product or service details in a table format. This allows customers to quickly scan their purchase items, prices, and quantities. Here’s an example of how you can set up a simple table to list purchased items:
| Item | Quantity | Price | Total |
|---|---|---|---|
| Product A | 1 | $15.00 | $15.00 |
| Product B | 2 | $10.00 | $20.00 |
By organizing your sales receipts in this manner, you make it easier for your customers to review their transactions and for your business to maintain clear records.
Include the transaction date on your sales receipt. This ensures both you and your customer can track the timing of the sale. QuickBooks automatically fills in the current date, but you can adjust it if necessary.
Provide accurate customer details, such as the name and contact information. This helps in keeping proper records for future transactions or customer support. You can input these manually or select from your QuickBooks customer list.
Clearly list the items or services purchased, including quantity and price per unit. This makes the receipt transparent and avoids misunderstandings. For multiple items, make sure each one appears in a separate line for clarity.
Apply taxes to your sale where required. QuickBooks allows you to automatically add sales tax based on the location or tax rate settings you’ve configured. Always check that the tax rate matches your region’s requirement.
Include any discounts or promotions applied. This shows your customer how much they saved, adding value to the transaction. You can input discounts directly on the receipt or through QuickBooks settings if recurring.
Include payment method details. Specify whether the customer paid by credit card, cash, or another method. This helps with recordkeeping and reconciling your accounts later.
Finally, add a unique receipt number for easy reference. QuickBooks generates these automatically, but you can customize your numbering system if needed for organizational purposes.
To adjust your sales receipt template settings, go to the “Sales” tab and select “Sales Receipt.” From there, choose the “Customize” option to access your template’s settings.
Here are the key adjustments you can make:
- Preview Changes – After selecting a template, click on the “Preview” button to see how your sales receipt will look. This allows you to review all design changes before finalizing them.
- Modify Layout – You can easily adjust the layout, moving sections such as the customer information, payment details, and itemized list. This gives you the flexibility to tailor the receipt to your business needs.
- Edit Content – Add or remove fields, like custom notes, discounts, or taxes. You can also insert your logo, adjust the font size, and select the color scheme to align with your brand.
- Choose Print or Email Options – You can modify whether the receipt is meant for printing or emailing, making sure it’s formatted correctly for each method.
- Save Template – Once satisfied with your customizations, save the template for future use. You can even set this template as the default for all new sales receipts.
Regularly review your settings to ensure they continue to meet your business’s needs, as QuickBooks allows easy updates to the design and functionality of your templates at any time.
To save your custom receipt template, click on the “Save” button after making the desired changes. The template will be stored in QuickBooks Online and available for future use. You can access it whenever you need by navigating to the “Sales” tab and selecting “Receipts” or “Custom Form Styles.”
Using Your Custom Template
When creating a new sale or receipt, select your saved template from the drop-down menu in the “Customize” section. This ensures that the receipt is generated using your custom design, keeping your branding consistent across all transactions.
Sharing the Template
If you need to share your custom receipt template with others, you can export it as a PDF or send it directly via email from within QuickBooks Online. This allows you to quickly share the template with colleagues, clients, or accountants without any hassle.
To create a sale receipt template in QuickBooks Online, follow these steps:
- Log in to your QuickBooks Online account.
- Click on the gear icon in the top right corner and select “Custom Form Styles.”
- Click the “New style” button, then select “Sales Receipt.”
- Choose a template to customize or start from scratch by selecting “Create New.” You can choose a basic template or one with more detailed options.
- Customize the layout. You can change fonts, colors, and other design elements to match your business brand.
- Modify the fields. Add or remove details such as customer information, item descriptions, payment methods, and taxes.
- Click “Preview PDF” to see how the receipt will look when printed.
- If you’re satisfied with the design, click “Done” to save the template.
Now, your custom sale receipt template is ready to use. When creating new sales receipts, select this template for a consistent and professional look.