Creating a clear and professional sales receipt for your small business is simple with the right template. A well-structured receipt not only helps with keeping accurate records, but also improves customer trust by offering transparency in every transaction. A template tailored to your business’s needs will save time and eliminate errors, making invoicing straightforward.
When designing your template, include the business name, address, and contact information at the top. Ensure you provide an invoice number for easy reference, as well as the date of the transaction. List the sold items with clear descriptions, quantities, and prices. This ensures that both you and your customer have a detailed record for future reference.
Don’t forget to include payment details–whether the customer paid by cash, card, or check. If applicable, add tax information and the total amount due. By organizing all of these details in a clean format, you make it easier to manage your accounting and maintain a positive relationship with your clients.
Here’s the corrected version:
For a small business, a well-structured sales receipt is crucial. Ensure it includes all necessary details for both you and your customer. Start by clearly displaying your business name, address, and contact details at the top. Include the date and a unique receipt number for tracking purposes. Then, list the items sold along with the price, quantity, and any applicable taxes.
Itemized Details
Each product or service should be broken down separately. Use clear descriptions for each item and include the price per unit, total cost, and applicable discounts. This transparency helps avoid confusion and builds trust with customers.
Tax and Total Amount
Make sure to specify the tax rate and show the total amount, including taxes. This makes it easy for customers to see how much they are paying for each item and why the total is what it is. A breakdown of the tax can be added if necessary.
End the receipt with a friendly note of thanks or an invitation for feedback. Finally, include your return or exchange policy to clarify customer expectations.
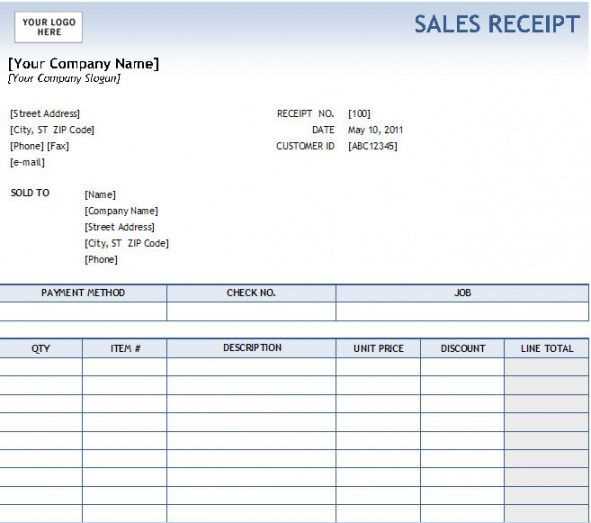
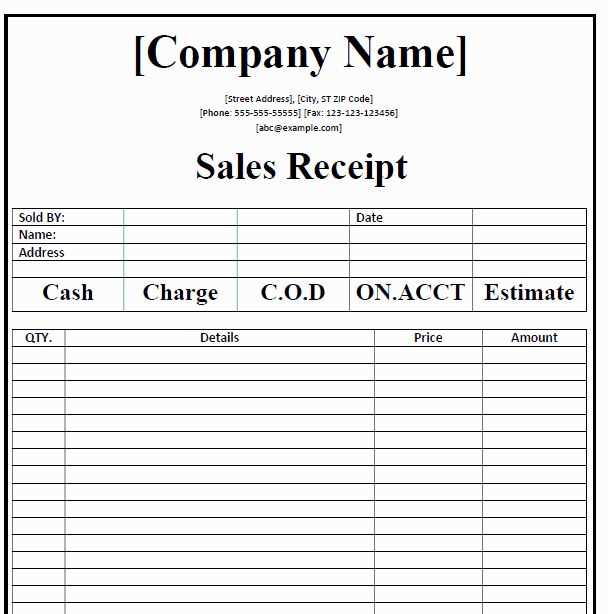
- Small Business Sales Receipt Template
Creating a simple and functional sales receipt template can help keep your transactions clear and organized. Use the following structure for a clean, easy-to-read document that can be customized for your business:
Key Components of the Sales Receipt
A well-organized sales receipt should include the following details:
| Component | Description |
|---|---|
| Date of Purchase | Indicates the exact date of the transaction. |
| Business Name and Address | Include your company name, physical address, and contact information. |
| Receipt Number | Unique identifier for tracking transactions. |
| Customer Information | Name and contact details (optional, if necessary for the transaction). |
| Items Purchased | List of items with their description, quantity, and price per unit. |
| Total Amount | Final total including taxes, discounts, or any additional fees. |
| Payment Method | Specify whether the customer paid by cash, card, or other methods. |
| Signature (Optional) | If applicable, the signature of the business owner or representative. |
Template Example

Here’s a simple template format you can use for your receipts:
---------------------------------------------
[Business Name]
[Business Address]
[Contact Info]
---------------------------------------------
Receipt Number: [12345]                     Date: [MM/DD/YYYY]
Customer Name: [John Doe]                Payment Method: [Cash/Card]
Item               Quantity     Unit Price    Total
-------------------------------------------------------
Product A            2          $15.00       $30.00
Product B            1          $10.00       $10.00
-------------------------------------------------------
Subtotal:                            $40.00
Tax (X%):                           $4.00
Total:                             $44.00
Thank you for your purchase!
---------------------------------------------
This format ensures that all necessary details are clearly presented, keeping your transactions transparent and professional.
Adjust your receipt template to fit the needs of your business by incorporating key elements that reflect your brand, services, and operational requirements. Here’s how to do it:
1. Include Your Business Name and Logo
Start with your business name and logo at the top. This helps reinforce your brand identity. Make sure the font is clear and easy to read, and ensure your logo fits well within the design. A consistent, professional look builds trust with your customers.
2. Set Up a Clear Itemized List
Break down the products or services purchased in a clean, organized list. Include item descriptions, quantities, and unit prices. This transparency builds credibility and helps customers track their purchases accurately.
- Item description
- Quantity
- Unit price
- Total amount
3. Add Payment Information
Clearly state the payment method used, whether it’s cash, credit card, or other forms. Include transaction details like the last four digits of the card or payment reference number for easy tracking.
4. Incorporate Tax Information
Ensure that taxes are listed separately from the item prices. Include the tax rate and total tax amount. If applicable, show both subtotal and total to make it easier for customers to understand the breakdown.
5. Personalize with Custom Fields

If your business needs specific details (like a warranty number, service date, or custom notes), add these as fields on your template. This ensures you cover all necessary information and keep receipts aligned with your processes.
6. Provide Contact Details
Include your business address, phone number, and email so customers can easily reach you for questions, returns, or support. This is especially important for small businesses where customer interaction is key.
7. Keep it Simple
A clean and minimalist design makes the receipt easier to read. Avoid cluttering it with excessive text or irrelevant details. Focus on the essential elements that serve the purpose of the receipt: clarity and accountability.
8. Add a Return Policy or Disclaimer

If applicable, provide a short return policy or disclaimer at the bottom. This informs customers about your return process and can help avoid confusion or misunderstandings down the line.
9. Use a Digital Version
Consider offering digital receipts to save paper and reduce waste. Digital receipts are easy to send via email or text, and they allow customers to track their purchases more efficiently. Make sure your template works well on mobile devices for a smooth customer experience.
To create a clear and accurate sales receipt, include the following details:
1. Date of Transaction
Include the exact date of the sale. This helps with record-keeping and can be crucial for both customer reference and tax purposes.
2. Itemized List of Products/Services

Provide a breakdown of each item sold, including descriptions and quantities. This ensures transparency and allows the customer to verify their purchase.
3. Total Amount Paid
The total amount, including taxes and discounts, should be clearly stated. This includes any shipping or handling fees if applicable.
4. Payment Method
Specify how the transaction was paid–whether through cash, credit card, check, or digital payment systems. This helps with reconciling payments and provides clarity for both parties.
5. Business Details
Include your business name, address, contact number, and email. This not only helps with communication but also ensures the customer can reach you for any questions or returns.
6. Transaction Number or Receipt ID
A unique identifier for the transaction makes it easier to track purchases and handle any potential issues later.
Start by selecting software that simplifies your receipt process. Look for tools that offer customizable templates so you can align the receipt design with your brand’s look. This ensures a professional presentation every time. Avoid overly complicated systems; the goal is to streamline, not complicate, your transactions.
Ease of Use and Integration

The software should integrate easily with your existing tools, like accounting or inventory systems. This saves time and avoids manual errors. Choose software with a clean interface that doesn’t require a steep learning curve. Many small businesses operate with limited staff, so quick, simple access is key.
Customization Options
Look for software that lets you adjust the receipt layout and include your company logo, business address, contact information, and any legal disclaimers. The more customizable, the better–it ensures receipts match your business’s unique style and helps with branding.
Some software also allows for automatic date, time, and tax calculation fields, making the process faster. These features reduce the risk of human error, improving both speed and accuracy.
Lastly, ensure that the software provides support for your business’s needs. Whether you’re running an online shop or a brick-and-mortar location, the right software should cater to those specific requirements without unnecessary extras. Try out a few options with free trials before committing to a long-term subscription to find the best fit for your operations.
Thus, repetitions decreased, and the meaning remained intact.
Reducing unnecessary repetition in sales receipts helps both the customer and the business. Focus on providing only the most relevant information while maintaining clarity. This approach ensures that the customer can quickly understand the purchase details without sifting through redundant data.
Keep It Simple
Eliminate repetitive elements like listing items multiple times or including extraneous disclaimers. Instead, highlight key aspects such as product name, price, and payment method. This makes the receipt concise while keeping its purpose intact.
Use Clear, Simple Language
Keep your language straightforward and to the point. Avoid excessive jargon or technical terms. When designing a receipt template, opt for a format that is easy to scan, with important details bolded or placed in distinct sections. This helps prevent confusion and ensures the document is functional and user-friendly.
By focusing on brevity and clarity, you can improve the customer experience and streamline your operations. A well-designed, minimalistic sales receipt can make a lasting impression and reduce the chances of misunderstandings.