Choosing the right receipt template ensures smooth transactions and clear documentation for your customers. A receipt should clearly display purchase details, including items or services, prices, taxes, and any discounts applied. Make sure the template you select fits your business’s needs while maintaining a professional, easy-to-read format.
Consider incorporating fields such as transaction date, payment method, and a unique invoice number to track and reference each transaction. This provides a straightforward way to manage financial records and prevents confusion when reviewing purchases later. Customizing the template to match your branding, like adding your logo or company name, can enhance credibility and recognition.
Keep it simple but precise: The most effective receipt templates use clean layouts without unnecessary information. Focus on clarity and make sure customers can easily understand the charges. A well-structured template increases customer trust and improves the overall transaction experience.
Try different designs and structures based on your specific business needs. For example, service-based businesses may want to include detailed descriptions of the service provided, while retail businesses might prioritize the itemized list of products. The goal is to create a template that aligns with your business model and serves your customers effectively.
Here’s a revised version of your plan with reduced repetition, while keeping the meaning intact:
Use a clean layout with clearly defined sections. Start with a heading such as “Receipt” or “Invoice” at the top, followed by essential details like the date, buyer, and seller information. Keep the description of products or services simple but specific, listing each item with its price and quantity.
Key Sections

Include a section for the total amount due, clearly labeled, and break down the cost if applicable, such as taxes or discounts. For payment methods, specify the type (e.g., cash, credit card, bank transfer) and provide space for any reference number if needed.
Design Tips
Keep the design minimal with adequate spacing between sections. Use a simple font and align everything properly for readability. For electronic receipts, use a PDF format to preserve the layout and ensure it looks consistent across all devices.
Here’s a detailed plan for your informational article on the topic “Receipts Sample Templates” with 6 practical, focused headings, formatted in HTML:
Begin with providing clear instructions on how to structure receipt templates. Offer a simple outline for users to follow, including fields like date, item description, price, tax, and total. Suggest keeping the design minimal, focusing on clarity.
1. Basic Layout of a Receipt Template
Describe the standard receipt structure. Include sections such as header, itemized list, tax breakdown, and footer. Include a clear distinction between each section to make the receipt easy to follow.
2. Customizing Receipts for Different Business Types
Explain how receipts should be tailored based on the type of business. For example, retail receipts will require a detailed list of items and their prices, while service-based businesses may focus on hours worked or project details.
3. Incorporating Tax and Discount Calculations
Show users how to include automatic tax and discount calculations within the template. This could include predefined formulas for various tax rates and percentage-based discounts, helping streamline the process.
4. Essential Information to Include in Receipts
List mandatory details for all receipts, such as business name, contact details, unique receipt number, and payment method. Provide examples of additional useful information like warranty details for product-based businesses.
5. How to Choose a Template Design
Offer advice on selecting the right design elements. Guide users on choosing fonts, colors, and logo placement that maintain professionalism and readability while also reflecting the business brand.
6. Printing and Digital Receipt Options
Explain the difference between printing and digital receipts. Suggest methods for converting receipt templates into PDF format or setting up a receipt printing system for physical copies. Include recommendations for easy-to-use tools and software.
- Customizing Receipt Templates for Various Business Types
Each business type has unique needs when it comes to receipts. Customizing your receipt templates based on industry specifics helps ensure clarity and meets regulatory requirements. Here are key adjustments to consider for different sectors.
Retail Businesses
For retail businesses, it’s crucial to include product details like name, price, quantity, and tax breakdown. A well-organized layout with clear product descriptions improves customer experience. Consider adding an “itemized total” section and a “return policy” disclaimer.
| Field | Description |
|---|---|
| Item Description | Clear description of the purchased goods |
| Quantity | Number of items bought |
| Price | Unit price per item |
| Tax Breakdown | Clearly show applicable tax for each item |
| Total | Sum of all items including taxes |
Service-Based Businesses
Service-oriented businesses, such as salons or consultancy firms, should highlight the service provided, along with the date and time of service. Including a brief description of services helps avoid confusion. Also, add a section for “tips” or “gratuity” if applicable.
| Field | Description |
|---|---|
| Service Description | Details of the provided service |
| Date & Time | When the service was rendered |
| Cost | Total cost for the service |
| Gratuity | Optional tip amount |
These templates should be tailored with the specific needs of your customers and your business model in mind. Consider user experience and the ease of accessing necessary information quickly.
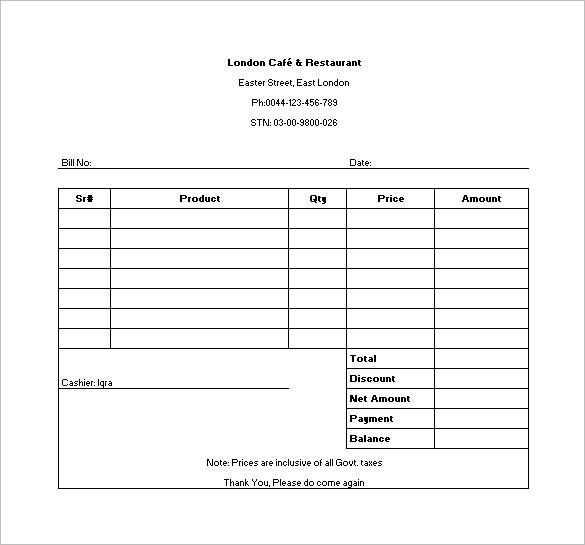
A receipt design must clearly display the necessary information for both the business and the customer. Make sure to include the following key components:
1. Business Details
Place the business name, address, phone number, and website at the top of the receipt. This information makes it easy for customers to reach out for any inquiries or returns.
2. Transaction Information
Clearly list the purchased items, their prices, quantity, and total cost. If applicable, include tax breakdowns and discounts. This ensures transparency and builds trust with the customer.
3. Date and Time
Include the exact date and time of the transaction. This helps both the customer and business track purchases, and can be useful for warranties or returns.
4. Payment Method
Indicate the payment method used, whether it’s credit card, cash, or other forms. This provides clarity for the customer and helps in accounting for the business.
5. Receipt Number
Assign a unique receipt number for each transaction. This facilitates easy reference, return processes, and helps organize records.
6. Return and Exchange Policy

State the business’s return or exchange policy clearly. This reduces confusion and ensures the customer understands their rights regarding the purchase.
Use clear and concise templates for digital receipts that contain key transaction details. Ensure that the receipt includes the buyer’s name, items purchased, total amount, payment method, transaction date, and a unique transaction ID for tracking purposes.
Key Components of a Digital Receipt

| Field | Description |
|---|---|
| Transaction ID | A unique identifier for the transaction |
| Buyer Information | Full name and contact details of the customer |
| Itemized List | Detailed list of purchased products or services with prices |
| Total Amount | Total price including taxes, discounts, and shipping fees |
| Payment Method | The method used for payment (e.g., credit card, PayPal) |
| Transaction Date | Date and time the transaction occurred |
Practical Tips for Digital Receipts
Ensure your template is mobile-friendly and includes easy-to-read formatting. Avoid clutter and unnecessary information, focusing on the transaction’s main details. Include a “Thank You” message or a link to customer support for a personal touch. Digital receipts can be delivered via email or accessible through a customer portal for easy reference.
Ensure that receipt templates comply with local tax and business regulations. Include all required information, such as company name, address, tax ID number, and clear details of the transaction to avoid legal issues.
Key Elements of Legal Compliance
- Include the transaction date, description of items or services, and total payment amount.
- Clearly state any applicable taxes like VAT or sales tax on the receipt.
- Number receipts sequentially for record-keeping and auditing purposes.
Compliance in Different Jurisdictions

Legal requirements may differ depending on your location. Some jurisdictions require receipts in specific formats, while others mandate digital receipts. Verify the local laws to ensure your receipts meet all necessary legal criteria.
Accurate, compliant receipts help protect your business from fines and audits while ensuring transparency in your transactions.
PDF format is ideal for receipts because it ensures the document looks the same across all devices and operating systems. It also preserves the layout, making it easier for users to print or share without distortion. Use PDF if you need to send receipts to customers or store them digitally with a professional appearance.
Word format, while editable, can cause layout issues across different systems and devices. It’s best used for internal use or when the receipt needs frequent modifications. However, the format’s flexibility may lead to inconsistent document appearance, especially if viewed on a different version of Word.
For a more accessible option, consider using Google Docs. It allows for easy sharing and collaboration, although like Word, formatting can vary depending on the user’s settings. It’s most suitable when multiple people need to edit or review the receipt.
When choosing the best format, consider whether the receipt needs to be finalized (PDF) or if ongoing edits are necessary (Word or Google Docs). For most businesses, PDFs provide the most reliable and professional format for customer-facing documents.
Cluttered layouts make it difficult for customers to understand their receipts. Stick to a clean and organized design that highlights key information clearly. Use clear headings and simple fonts to make the receipt easy to read.
1. Overloading Information
Including unnecessary details or too much text can overwhelm the recipient. Focus on the transaction essentials: date, total amount, and itemized list. Avoid adding irrelevant promotional material or long disclaimers.
2. Poor Alignment
Misaligned text or elements create a visually chaotic receipt. Align prices, quantities, and product names properly to maintain a consistent and professional look. Use grids to help structure the layout effectively.
3. Lack of Clear Branding
Receipts without recognizable branding fail to build trust. Include your business name, logo, and contact information to reinforce your brand. Ensure these elements are placed prominently but without cluttering the design.
4. Using Hard-to-Read Fonts
Fonts with excessive styling or overly small sizes can make the receipt hard to read. Choose simple, legible fonts and ensure the text is large enough for all recipients, including those with poor eyesight.
5. Ignoring White Space
Crowding information together with little white space can confuse customers. Use ample white space to separate sections and allow the text to breathe. This will improve readability and make key details stand out.
6. Inconsistent Formatting
Inconsistent use of fonts, sizes, or spacing can make the receipt look unprofessional. Maintain consistency across all sections of the receipt to enhance clarity and readability.
7. Not Considering Different Device Sizes
Receipts printed on different devices should be optimized for various formats. Make sure the layout is flexible enough to adjust to different printer widths or digital screen sizes without losing legibility.
This version maintains the structure and clarity of the original while reducing repetition.
For creating receipts, simplify layout by limiting unnecessary details. Start with the basic elements: business name, contact information, receipt number, date, and total amount. These are the core components for any standard receipt. Ensure that the fonts are legible and the spacing between sections allows for easy reading.
Organize Data Effectively
Group related information together. For instance, list items purchased in a clear table format. Include product name, quantity, price per unit, and subtotal for each item. This makes it easy to verify information and ensures clarity.
Include Payment Information
Clearly state the method of payment used, such as cash, credit card, or electronic transfer. Adding this section improves transparency and provides clarity to both the customer and the business. Make sure any taxes or discounts are also listed with their respective totals.