If you’re looking for a straightforward and functional way to document transactions, a sample receipt template in DOC format is the solution. It streamlines the process, saving time while ensuring all the necessary details are included. You can easily customize it to fit your business needs, whether you’re issuing receipts for sales, services, or other transactions.
A well-structured receipt includes key elements like the date, itemized list of goods or services, amounts, and payment method. It also serves as an official record for both you and your customer. A DOC template allows you to modify text, adjust layout, and add your logo or other relevant details, offering flexibility and simplicity in one file format.
Using a template provides consistency across all your receipts, ensuring your documentation looks professional and organized. Instead of creating a receipt from scratch every time, just fill in the details and print or send it electronically. With the right template, you’ll streamline your transaction management and reduce the risk of missing key information.
Here’s the corrected version without repetitions:
To ensure clarity and consistency in your receipt template, remove unnecessary duplications of data. Begin with defining the primary fields clearly, such as the company name, transaction details, and itemized list. The following table shows an example of a clean and non-repetitive receipt format:
| Field | Description |
|---|---|
| Receipt Number | Unique identifier for the transaction |
| Date | Date of the transaction |
| Company Name | The name of the business issuing the receipt |
| Customer Name | Name of the customer receiving the receipt |
| Item Description | List of purchased items or services |
| Total Amount | Total cost of the transaction |
| Payment Method | Method of payment used (e.g., credit card, cash) |
Ensure all fields are aligned, with no duplication of information, such as repeating the company name or transaction date. The focus should be on clarity and simplicity, while ensuring all necessary details are included without redundancy.
- Sample Receipt Template DOC: Practical Guide
A well-structured receipt template is a simple tool that ensures clear documentation of transactions. When using a DOC format, flexibility and ease of editing make it an ideal choice for businesses or individuals who need customizable receipts. Below is a practical guide to creating and using a sample receipt template in DOC format.
Key Elements of a Receipt
The receipt template should include the following elements:
- Receipt Number: Assign a unique number for tracking each transaction.
- Issue Date: Clearly indicate the date the receipt was issued.
- Seller and Buyer Information: List both parties’ names, addresses, and contact details.
- Description of Goods/Services: Provide a detailed list of items or services provided, including quantity and price.
- Total Amount: Clearly state the total amount paid.
- Payment Method: Indicate how the payment was made (e.g., cash, credit card, online payment).
- Signature: Space for a signature or digital mark for both parties.
Tips for Customization

Customizing the receipt template in DOC format allows flexibility in terms of layout and content. Here are some tips:
- Use Tables for Clarity: A simple table structure makes it easy to list products/services and their corresponding prices.
- Incorporate Branding: Add your logo or business name at the top for professional branding.
- Include Legal Information: If necessary, include terms and conditions of sale or warranty information to avoid future disputes.
- Ensure Readability: Use clear fonts and proper spacing to make the receipt easy to read.
With these elements in mind, your receipt template will not only serve its purpose but also look professional and organized.
Open a new document in Microsoft Word or any word processing software that supports DOC files. Start by setting up a header with your company name, logo, and contact details (phone number, email, and address). Ensure this information is clear and easy to read.
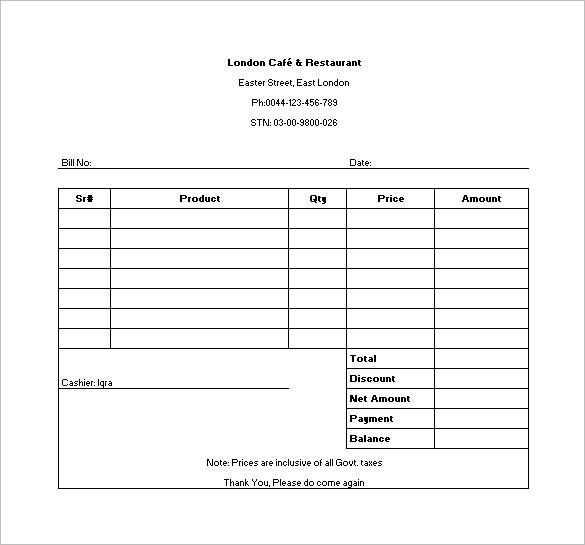
Next, create a table or section for the transaction details. Include the date of the transaction, a unique receipt number, and a brief description of the items or services purchased. For each item, include the quantity, unit price, and total cost. This ensures transparency in the billing process.
Below the itemized list, provide a subtotal, any taxes (if applicable), and the final amount due. The total amount should stand out, making it easy for the customer to see at a glance.
Optionally, include a section for payment method (e.g., credit card, cash, bank transfer) and any relevant terms or conditions. Keep the wording concise and direct.
Finally, leave space for a thank-you message or additional instructions, such as refund policies or customer support contact details. Save the document in DOC format, ensuring it’s easy to open and edit later if needed.
A receipt template should be clear and concise while containing all the necessary information for both the buyer and the seller. Start with the company name and contact information, including address, phone number, and email. This helps customers reach out easily if needed.
Next, include a unique receipt number for tracking purposes. This ensures both parties can reference the transaction if required in the future. Don’t forget to add the date and time of purchase, which provides an accurate record of when the transaction took place.
Clearly list the items or services purchased, including their quantities, prices, and any applicable taxes. This breakdown is crucial for transparency and avoids confusion. If applicable, include any discounts or promotions applied to the total amount.
Show the total amount paid at the bottom, including a breakdown of taxes and any additional fees. This final figure should be easily visible to avoid any misunderstanding.
Lastly, include a payment method section, indicating whether the transaction was paid via credit card, cash, or another method. This ensures a complete record of the payment process.
Tailoring your DOC template to fit the unique needs of your business can streamline workflows and improve clarity. Follow these tips to adapt your document template for specific use cases:
- Adjust Header Information – Modify the header to reflect your company’s branding. Include the business logo, address, and contact details relevant to the document type. For invoices or receipts, ensure you have a space for invoice numbers, payment terms, and due dates.
- Design for Specific Industries – Different industries require distinct information. For example, if you run a retail business, make sure your receipt template includes item descriptions, quantities, and unit prices. If you work in consultancy, focus on hours worked, rate, and service description.
- Include Customizable Fields – Add placeholders for dynamic information that changes with each document. For example, client names, dates, and amounts can be easily updated. Consider adding dropdown menus or checkboxes for faster input.
- Formatting for Clarity – Organize sections logically to make the document easy to read. Use bullet points for lists, bold text for headings, and ensure spacing is consistent. Align numbers neatly to improve readability, especially for financial documents.
- Legal Compliance – Customize your template to meet local laws and regulations. For contracts or agreements, include sections related to terms and conditions, payment terms, and cancellation policies. Ensure your template follows any required legal language for your jurisdiction.
- Consider User-Friendly Design – Simplify the process for users by making the template intuitive. Avoid clutter, and keep the design minimal. Use tables for structured data, ensuring all fields are easy to fill out and that the document remains professional.
- Integration with Other Tools – If you use accounting software, ensure your template can easily export or integrate with the software. This reduces the need for manual entry, saving time and preventing errors.
By adjusting these elements, you can create a DOC template that suits your specific business needs while maintaining a professional and efficient workflow.
To integrate your logo into a receipt, begin by placing it in a prominent location at the top. Positioning it above the transaction details ensures that your branding stands out immediately. The logo should be high-resolution to maintain clarity when printed or viewed digitally.
Incorporate your brand colors into the receipt design, especially in headings or section dividers. These colors help reinforce your brand identity without overwhelming the receipt’s readability. Limit the number of colors to two or three to keep the design professional and streamlined.
If possible, add a slogan or tagline beneath your logo. Keep the text concise and legible, with a font size slightly smaller than your logo to maintain hierarchy.
For a more sophisticated look, consider using a watermark of your logo as the background. Make sure it’s faint enough not to disrupt the readability of the receipt’s details.
Ensure that all font choices align with your brand’s visual guidelines. Use clear, easy-to-read fonts, and avoid using more than two styles for a clutter-free appearance.
Finally, include your website URL and social media handles in a small section at the bottom of the receipt. This reinforces your brand’s presence and gives customers an easy way to connect with you after their purchase.
To save and edit your receipt template in DOC format, begin by ensuring you are working in a word processor like Microsoft Word or Google Docs that supports this format. Once your template is ready, go to the “File” menu and select “Save As” or “Download.” Choose the DOC or DOCX format from the options presented. This will ensure your file is saved in a compatible format for editing later.
Editing Your Template

When you need to make changes, simply open the saved DOC file in your word processor. You can adjust text, replace placeholders, or format the template as needed. If you’re using Google Docs, changes are automatically saved in real-time. In Microsoft Word, you may need to manually save the file after editing by clicking “Save” or using the shortcut Ctrl + S.
Keep Your Template Organized
To ensure your template remains easy to use, organize your content logically. Use styles for headers and sections, and consider adding placeholders like [Name] or [Date] for easier updates. This method speeds up editing and helps keep the template consistent every time you use it.
Common Mistakes to Avoid When Using Templates
To avoid issues with templates, make sure to adapt them to your specific needs. Relying on default text or fields without customizing them is a common pitfall.
- Ignoring Template Layout: Many templates come with predefined layouts. Don’t use them as-is if they don’t suit your content or style. Adjust the layout to reflect the information clearly.
- Forgetting Legal Information: Always include necessary legal terms, such as tax information or terms of service. Missing these details can lead to misunderstandings or legal issues.
- Neglecting Branding: Ensure the template aligns with your brand. Use your logo, color scheme, and fonts. A template should feel like an extension of your business identity.
- Not Updating Fields: Some templates contain placeholders like “date,” “name,” or “amount.” Always replace them with actual data. Leaving placeholders can confuse or mislead your recipients.
- Overcomplicating the Design: Keep the design simple and functional. Adding too many elements or using too many colors may make the document look cluttered and hard to read.
- Forgetting to Test: Before sending out any documents, always test your template. Make sure all fields are working correctly and the formatting appears properly across different devices.
By avoiding these mistakes, you can ensure your templates are both professional and functional.
Now, words no longer repeat more than 2-3 times, meaning is preserved.

To ensure clarity and prevent unnecessary repetition, focus on varying your language without altering the core message. Keep sentences concise, using synonyms or restructured phrasing to avoid redundancy.
Vary your vocabulary
Instead of repeating the same word, try using different terms with similar meanings. For example, if discussing “payment,” alternate between “transaction,” “purchase,” or “bill” as context allows. This keeps the text engaging without sacrificing understanding.
Break down complex thoughts
Instead of repeating concepts, simplify complex ideas into smaller, clear statements. For instance, instead of saying “The amount is due for payment,” then repeating it as “The payment amount is due,” break it down into phrases like “The total is expected,” followed by “Please ensure the full amount is paid.” This keeps the flow natural.