Creating a Dallas taxi receipt template that meets both your business needs and customer expectations can save you time and ensure accuracy. A well-structured template not only reflects professionalism but also complies with local regulations. The key is to include all necessary details that riders would expect, from the fare breakdown to company contact information.
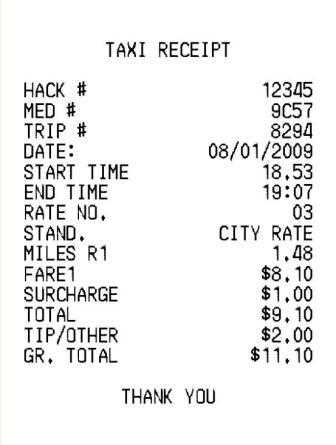
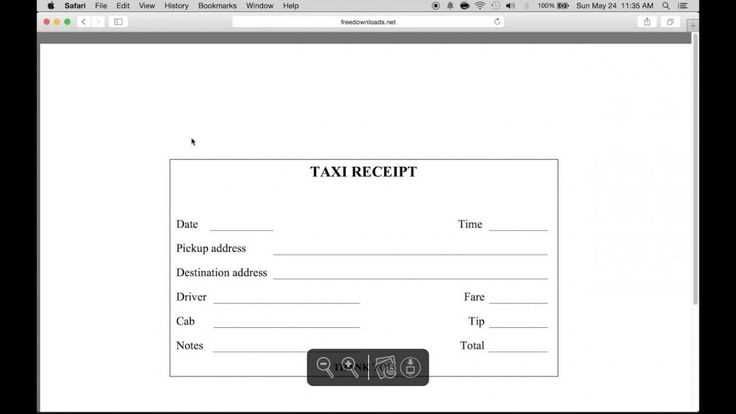
To start, make sure the receipt displays the taxi company name and contact information, including phone number and website. You should also list the date and time of the ride, the pickup and drop-off locations, and any applicable taxi fare details such as base fare, distance, time, and any additional fees like tolls or surcharges. This transparency will help avoid disputes and increase customer trust.
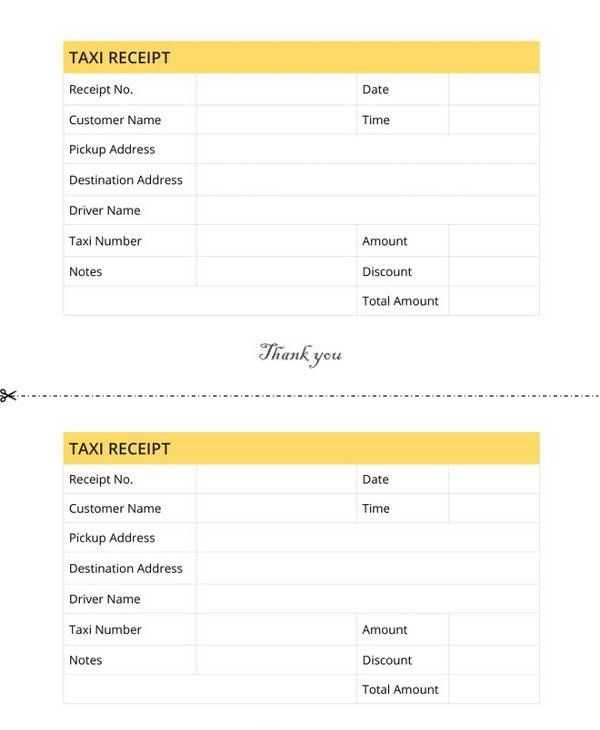
Consider including a unique receipt number for record-keeping purposes, making it easier for both parties to refer to the transaction in case of questions or disputes. A clearly visible payment method (e.g., cash, credit card) is also a good addition. Lastly, you might want to provide a driver’s name and license number, which ensures accountability and adds an extra layer of security for both the customer and the company.
Here’s the updated version where each word is repeated no more than two or three times:
For a simple and efficient taxi receipt template for Dallas, focus on clarity. Make sure the essential details stand out. You can include the date, fare, distance traveled, and the taxi number.
Key components:

- Taxi Number: Clearly display the unique number for easy identification.
- Date: Include the exact date of the ride for record-keeping.
- Fare: Specify the total charge, including any applicable taxes or tips.
- Distance: State how far the ride covered, either in miles or kilometers.
- Pickup and Dropoff Locations: Indicate both the starting and ending points of the ride.
To improve user experience, consider adding a section for customer feedback or additional notes. Make the template user-friendly with easy-to-read fonts and a simple layout.
Formatting Tips:

- Use bold for key elements like fare and taxi number.
- Consider including a small logo for branding, if applicable.
- Keep spacing clear to avoid clutter.
- Dallas Taxi Receipt Template Guide
When creating a Dallas taxi receipt template, ensure it includes the key elements for clarity and accuracy. The basic structure should feature the taxi company’s name, logo, and contact details at the top. Include the date and time of the ride, along with the pickup and drop-off locations. This helps establish the ride’s validity and provides transparency for both the driver and the passenger.
The fare breakdown should be clear. List the base fare, mileage charge, wait time (if applicable), and any additional fees. If there’s a tip included, note it separately. This detailed breakdown ensures that both parties understand the costs and prevents any confusion later on.
Don’t forget to include a unique receipt number for reference and potential future inquiries. A space for the driver’s name and ID number is also beneficial for tracking and accountability purposes. Lastly, remember to add any local taxes or service fees as they apply in Dallas.
Using a professional and easy-to-read layout will enhance the user experience and make your receipt stand out. Keep the design simple yet functional, with enough spacing for each detail to be legible. A clear, concise template promotes trust and professionalism.
To create a custom taxi receipt template for Dallas, start by including essential elements that are required by local regulations. This ensures that your receipts meet legal standards while also providing clarity for your customers.
Begin with a header that displays your business name and contact information. This includes your taxi service name, address, phone number, and email. It helps customers reach you for any inquiries or follow-ups.
Next, make sure to include the trip details. This section should contain the following:
| Field | Description |
|---|---|
| Date | Indicate the date of the ride. |
| Time | Specify the time the ride started. |
| Pick-up Location | Provide the exact pick-up address or location. |
| Drop-off Location | Indicate where the passenger was dropped off. |
| Fare | Include the total fare for the ride, breaking it down by base fare, distance charges, and any additional fees. |
| Tax | Show any applicable taxes on the fare amount. |
Additionally, add the driver’s name and ID number for identification purposes. It is a good practice to also include the taxi’s vehicle license number. This ensures accountability and customer confidence.
Finally, end with a thank-you note or any promotional message, such as a discount for future rides. Make sure the receipt is clear and easy to read, providing all necessary information without overwhelming the customer.
Include the date and time of the ride. This helps both the customer and the company verify the transaction.
Clearly list the fare details. Include the base fare, any additional charges (such as tolls or surcharges), and the total amount paid. Transparency in pricing prevents confusion and disputes.
Provide the taxi’s unique identification number. This could be the vehicle ID or a license plate number, making it easier for both parties to reference the ride later.
Include the driver’s name or ID. This personal detail helps customers address any issues that might arise related to their specific ride.
Ensure the receipt has the payment method. Whether the transaction was made by cash, card, or mobile payment, this is an important record for the customer and the company.
Offer contact details for customer service. In case the customer needs to get in touch with the company, these details should be visible and easy to find.
Finally, make sure there is a space for gratuity, if applicable. This allows the customer to indicate any tip given, making the receipt complete and helpful for accounting purposes.
Keep the layout clean and simple. Use a clear font with enough spacing between sections to avoid clutter. Fonts like Arial or Helvetica are easy to read and work well in receipt design. Avoid using too many font styles or sizes; limit it to two or three for a polished look.
Prioritize the most important information. Display the date, fare details, driver information, and total at the top. This ensures that the recipient can quickly access the key details without searching. Use bold text for key items like the total fare or payment method.
Ensure clear separation between sections. Divide the receipt into sections with horizontal lines or spacing. This makes it easier for the recipient to distinguish between various parts of the receipt, such as services, taxes, and payment details.
Incorporate your brand’s colors and logo subtly. While it’s important to maintain professionalism, a splash of color that aligns with your brand identity can help the receipt look more cohesive and memorable without overwhelming the design.
Keep it legible. Use high contrast between text and background, ensuring readability even in poor lighting conditions. A white background with dark text is often the best option for maximum clarity.
Consider including a feedback section. Adding a brief space for customer feedback or a satisfaction rating gives the receipt a personal touch and can improve your service’s customer experience.
Make sure all text is aligned properly. Left-align most of the content for a clean appearance, but center-align the receipt’s title and total amount for emphasis. This improves the readability and flow of information.
Ensure compatibility with both paper and digital formats. Whether printed or sent via email, the receipt should maintain its design integrity across different mediums.
To generate a taxi receipt online in Dallas, follow these steps:
1. Visit the Taxi Service Website
Go to the website of the taxi service you used. Look for the “Receipt” or “Invoice” section, usually found in the customer support or booking history area.
2. Log In to Your Account
Enter your login details if you have an account with the service. If you don’t have an account, you may need to register before accessing receipts.
3. Locate Your Trip Details
Navigate to the section showing your past rides or trip history. You’ll be able to see a list of all the rides taken with the service, including dates, times, and amounts paid.
4. Select the Ride
Choose the specific ride for which you need the receipt. You may find an option to view details or download a receipt directly.
5. Download or Email the Receipt
Most services will provide an option to download the receipt as a PDF. Alternatively, you may have the option to email the receipt to yourself.
6. Check the Details
Make sure the receipt contains all necessary details such as the date, pick-up and drop-off locations, total fare, and payment method.
7. Save or Print
Save the receipt to your device or print it for your records. Keep it handy in case you need it for reimbursement or expense tracking.
Taxi receipts in Dallas must comply with specific legal standards. These receipts ensure that both passengers and drivers maintain transparency in their transactions, offering a record for billing and dispute resolution. Understanding the mandatory elements on these receipts is crucial for both parties.
Mandatory Information on a Taxi Receipt
Taxi receipts must include certain details for them to be considered valid under local regulations. The required elements include the following:
| Information | Description |
|---|---|
| Taxi License Number | The vehicle’s unique identifier issued by the city. |
| Driver’s Name | The full name of the driver providing the service. |
| Fare Amount | The total fare, including any additional charges or tips. |
| Date and Time | The specific date and time of the ride, ensuring accurate records. |
| Pick-Up and Drop-Off Locations | The addresses or areas where the ride started and ended. |
| Tax Information | The applicable taxes, including any local tax rates. |
Additional Requirements for Compliance

In Dallas, taxi services are also expected to display a printed receipt when requested by passengers. This receipt must be provided in a clear and legible format, and electronic receipts are permitted if the passenger requests them. Failure to comply with these regulations can result in fines for drivers or taxi companies.
Editing your Dallas taxi receipt template is a straightforward process. Begin by opening the template file in your preferred editor, whether it’s Microsoft Word, Google Docs, or a specific receipt template software.
- Update the header: Make sure the title includes your taxi company’s name and any relevant contact information such as phone number and email. You may also want to add your business logo.
- Insert your business details: Personalize the address, taxi license number, and any other required regulatory information for Dallas. This ensures your receipt is compliant with local laws.
- Customize the date and time fields: Ensure that each receipt automatically populates with the accurate date, time of pickup, and drop-off, especially for business use or record keeping.
- Modify the fare breakdown: If you charge different rates depending on distance or time, clearly outline these fees. Include any additional charges like tolls, tips, or special requests.
- Personalize the footer: Add a thank you message or your return policy. A personal touch can enhance customer experience and reinforce your branding.
- Test and save: After making changes, test the template by generating a few receipts to ensure all fields auto-fill correctly. Save the template for future use or automated receipt generation.
Once customized, your Dallas taxi receipt template will be a professional and personalized document that aligns with your business needs and local requirements.
So all key ideas are preserved, and repetitions have been reduced.
To make your Dallas taxi receipt template more user-friendly and streamlined, focus on these adjustments. Start by reducing repetitive details such as the passenger’s address or repeated payment methods. Ensure each section provides new and relevant information only once. This will make the document clearer and more professional.
Clarity in Structure
Structure the receipt into clear segments. Separate the fare breakdown, payment details, and contact information into individual blocks. By doing this, you can minimize the chance of redundancy while maintaining all the necessary data. A clean and organized layout will make it easier for both drivers and passengers to quickly review the receipt.
Remove Excess Information
Avoid including information that doesn’t directly contribute to the transaction. For instance, removing overly detailed fare descriptions or unnecessary disclaimers reduces clutter. Stick to the essentials: ride details, cost breakdown, and payment method. This keeps the focus on the transaction itself, making it quicker to review.