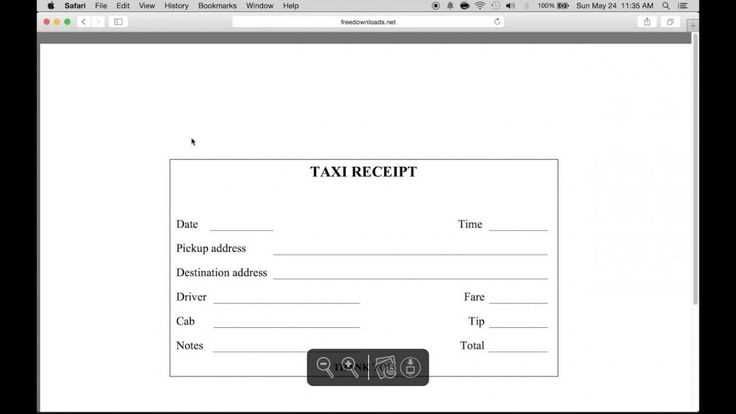
Need a simple, ready-to-use taxi receipt template? A well-structured receipt helps passengers track expenses and ensures drivers maintain accurate records. Whether for business reimbursements or personal bookkeeping, a standardized format keeps things organized.
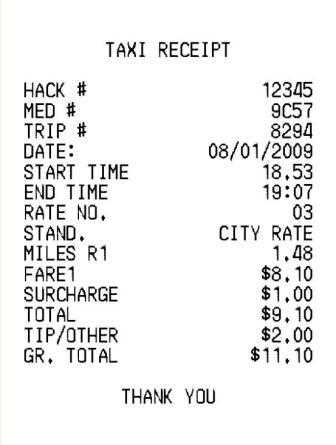
A proper taxi receipt includes key details: date, time, fare breakdown, payment method, and company or driver information. Adding a unique receipt number simplifies record-keeping and prevents duplicates. For businesses, including tax details ensures compliance with financial regulations.
Customizing a generic template is easy. Digital receipts with editable fields allow quick adjustments, while printable versions work for cash payments. If you operate a taxi service, branding your receipts with a logo and contact information adds credibility and professionalism.
Downloadable templates in PDF, Word, or Excel formats offer flexibility, catering to different needs. A structured layout saves time, reduces errors, and provides clarity for both passengers and drivers. Choose a template that suits your workflow and keeps transactions seamless.
Here’s the corrected version without unnecessary repetitions:
Ensure the receipt layout is clear and easy to read. Keep the format simple, with the necessary details like date, time, passenger name, fare, and the driver’s information. Avoid listing redundant elements such as multiple addresses or lengthy terms of service. Limit text to the most relevant information only. This makes it easier for customers to understand the receipt at a glance.
Key Components of a Taxi Receipt

The receipt should display the following key components:
– Taxi company name and logo
– Passenger name (optional)
– Fare amount and breakdown (if applicable)
– Date and time of the ride
– Pickup and drop-off locations (concise)
– Driver’s contact details (or badge number)
This format ensures clarity and helps avoid confusion.
Formatting Tips
Use legible fonts and clear headings to guide the reader’s eye. Align text properly and make sure to leave enough space between sections. It’s also a good practice to include a small note for feedback or customer service inquiries at the bottom of the receipt.
- Generic Taxi Receipt Template: Practical Guide
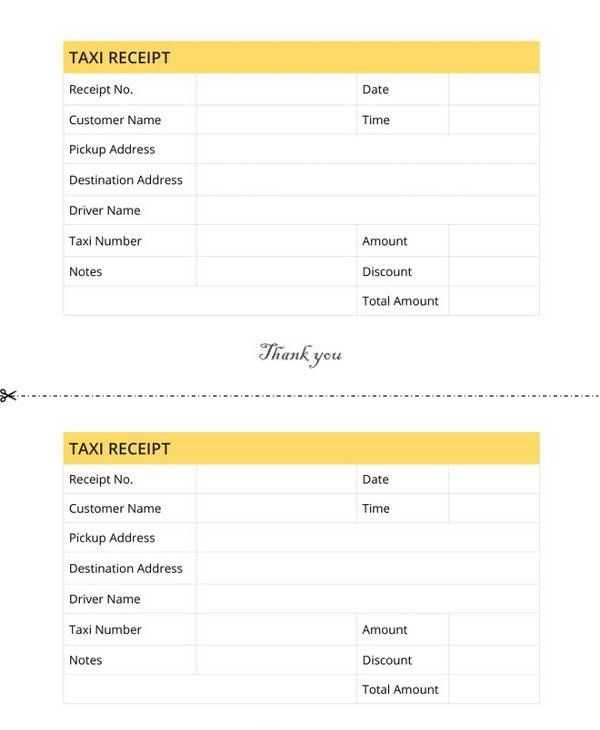
A generic taxi receipt template should include clear, straightforward fields that allow easy input and quick understanding of key transaction details. Here’s a practical guide to crafting your own:
| Field | Description |
|---|---|
| Taxi Company Name | Include the name of the taxi service or business. |
| Driver’s Name | Always list the driver’s full name for identification. |
| Receipt Number | Assign a unique number to each receipt for easy tracking and reference. |
| Pickup and Drop-off Locations | Clearly state where the passenger was picked up and where they were dropped off. |
| Date and Time | List both the date and exact time of the ride. |
| Fare Details | Include the base fare, distance, time charges, and any additional fees. |
| Total Amount | State the final amount paid for the ride. |
| Payment Method | Indicate whether the payment was made in cash, by card, or other methods. |
| Tax Information | If applicable, include the tax rate and the tax amount. |
Having these fields makes the receipt both functional and reliable. By providing all relevant details, you ensure transparency for both the customer and the business.
Additionally, consider leaving space for contact details, customer service information, and a brief disclaimer about terms of service, especially in case of disputes.
In a taxi receipt template, clarity and accuracy are paramount. Start with including the taxi company’s name, logo, and contact details, so customers can easily reach out if needed. This establishes brand identity and ensures transparency.
Transaction Details
Next, include key transaction information such as the date and time of the ride, pickup and drop-off locations, and the fare breakdown. This allows the customer to verify the charges. Include any additional fees (like tolls or surcharges) for full transparency.
Payment Method and Amount
Clearly state the total amount paid, along with the method of payment (cash, credit/debit card, etc.). If a tip was provided, specify it separately. This eliminates confusion and provides a clear record of the transaction.
For a polished receipt, add a unique receipt number for reference. This makes it easier to track transactions and resolve any disputes that may arise.
Customizing a taxi receipt for your business helps ensure you capture the specific details that align with your operations and improve financial tracking. Here are some steps to tailor a receipt that fits your needs:
1. Add Business Information

- Include your business name, address, and contact details at the top of the receipt. This allows customers to identify your company and reach out if needed.
- Optionally, add your business logo for brand recognition.
2. Specify Payment Details
- Clearly outline the fare breakdown, including base fare, distance charges, surcharges, and any discounts applied.
- Provide clear payment options, whether it’s cash, card, or an app-based transaction.
- List the total amount paid and specify the tax rate, if applicable, for transparent accounting.
3. Include a Unique Transaction ID
- Incorporating a unique ID helps track individual transactions for easy reference in case of disputes or inquiries.
- This ID can also aid in integrating receipts into your business accounting software for efficient record-keeping.
4. Time and Date of the Ride
- Always record the exact date and time of the ride, as this helps in sorting receipts for audits or any client billing queries.
5. Custom Fields for Corporate Clients

- If offering services to corporate clients, add custom fields such as a department code or project reference for expense tracking.
- Ensure the receipt has a space for client signatures or confirmation if necessary for invoicing purposes.
6. Additional Features for Your Business
- If needed, offer a “Thank You” or personalized message at the bottom of the receipt to build stronger customer relationships.
- Consider including a QR code linking to a feedback page or business website for customer engagement.
For creating a receipt template, the most common formats are PDF, Excel, and Word. PDF is a preferred option for its universal compatibility and fixed formatting, making it ideal for professional use. Excel offers flexibility with its grid structure and calculation capabilities, perfect for businesses that need to adjust amounts or create custom formulas. Word, while less structured, provides a simple layout option for businesses that require quick, editable templates.
For creating these templates, there are several tools that stand out. Adobe Acrobat is widely known for generating PDF templates with precise control over design and text. For Excel templates, Microsoft Office’s built-in tools are user-friendly and offer pre-made templates, but advanced users can enhance these with macros or formulas. Word’s template creation benefits from easy-to-use formatting options and can be customized quickly for a variety of receipt types. Additionally, online tools like Canva or Google Docs can be useful for those seeking flexibility and cloud access, while more design-focused tools such as Lucidpress allow for highly tailored layouts.
When selecting a tool, consider ease of use, customization options, and compatibility with your business needs. Whether you’re looking for simple text or need to incorporate calculations and graphics, choosing the right format and tool can streamline your receipt creation process.
When designing a generic taxi receipt template, make sure you include all necessary details for clarity. Start with a clear header indicating that it’s a taxi receipt. Include the taxi company name and logo at the top for easy identification.
The date and time of the ride are key elements to add. This allows both the passenger and the company to track specific transactions. Also, display the pickup and drop-off locations with enough space for address details. If applicable, you may also include the driver’s name and license number for added transparency.
Provide a fare breakdown section, detailing the cost of the ride, any additional charges (like tolls or waiting fees), and tips. The total fare should be clearly marked at the bottom of the receipt for quick reference.
Lastly, consider including a contact section with customer service details. This makes it easier for passengers to reach out if they have any concerns or need assistance with the receipt.