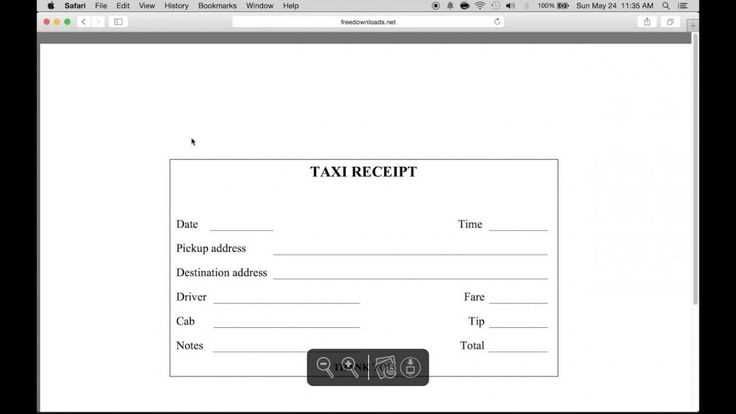
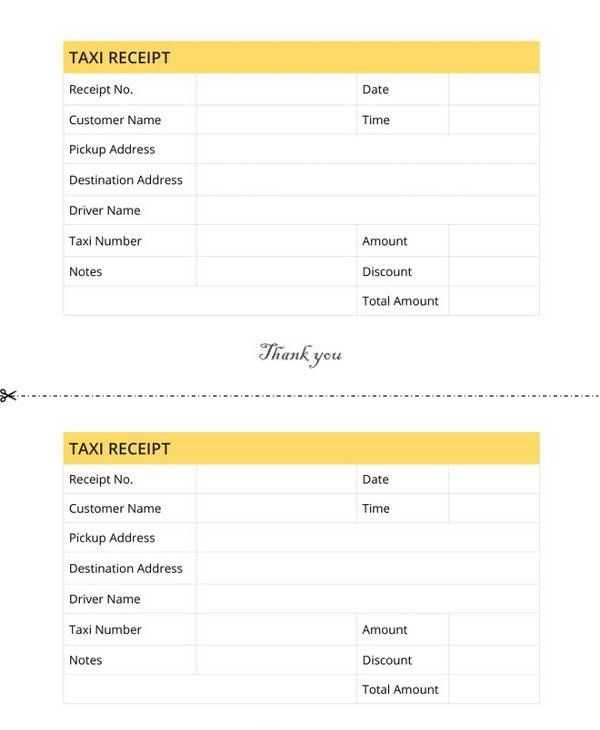
Creating a taxi receipt book template can streamline your business and ensure smooth operations for both drivers and passengers. A well-designed template should include all the necessary fields for clear and concise documentation, such as the passenger’s name, fare amount, date, time, and trip details.
The layout should allow easy filling, and every receipt should feature a unique number for record-keeping. This helps prevent confusion and ensures a clean, organized system. Add a spot for both the driver’s and passenger’s signatures to avoid potential disputes and ensure legitimacy.
Consider making the template available in digital format as well. This way, it can be printed on demand, saving time and reducing waste. Adjust the template to reflect your local regulations, making sure it complies with tax requirements or other legal obligations.
Choosing the Right Template for Your Business
Pick a template that matches your company’s style and needs. Choose one with clear, readable fields for capturing essential details like date, fare, and driver information. Avoid overly complicated designs that could confuse both your staff and customers.
Look for a customizable layout that allows you to add your business logo and contact details. This ensures that every receipt reinforces your brand identity. Prioritize templates with easy-to-read fonts and proper spacing to minimize errors during filling out the forms.
If you handle multiple types of fares or services, select a template with categories or sections that can accommodate variations in pricing. This helps maintain accuracy and reduces the chances of mistakes. Make sure the template is compatible with the software you use for printing or storing receipts.
Consider scalability–if your business expands, you may need to switch to a more complex template. Choose one that can grow with your business, offering features like bulk printing options and the ability to track receipts over time.
How to Customize the Template for Legal Compliance
To ensure that your taxi receipt book template meets legal requirements, follow these steps:
1. Include Company Information
- Add your company name, address, and contact details in a clearly visible spot.
- Include your business registration number, VAT ID (if applicable), and licensing details.
2. Add Required Tax Information
- Ensure that the receipt shows the correct tax rate for the services provided.
- Incorporate a field for the total amount of tax charged on each ride.
- Verify that your template adheres to local tax laws, including any specific tax requirements based on your location.
3. Specify Passenger and Ride Details

- Include the date, time, and location of each trip.
- Provide space for capturing the name of the passenger and the destination address.
4. Integrate Payment Information

- Provide fields for payment method (cash, card, online transfer).
- Include a field for the total fare, and break it down by base fare, distance, or time.
5. Make Space for Legal Disclaimers
- Add any necessary legal disclaimers regarding liability and the company’s terms of service.
- Ensure the template complies with consumer protection laws, specifically in relation to refund policies and dispute resolution.
Design Tips for Clear and Professional Receipts
Keep the layout simple and well-organized. Clear headings and sections help customers quickly locate important details like total fare, date, and payment method. Avoid cluttering the receipt with unnecessary information or graphics that may distract from the key details.
Choose legible fonts. Use easy-to-read typefaces like Arial or Helvetica. Ensure the font size is large enough to be read without straining, especially for key information such as the total amount and service details.
Use a clear hierarchy for information. Place the most crucial details–such as the company name, contact information, total amount, and payment method–at the top or center of the receipt. This ensures the user knows where to look first.
- Company name and contact info: Top of the receipt.
- Service details: Clear, concise list.
- Total fare: Bold or highlighted.
- Payment method: Clearly indicated.
Include space between different sections. This provides visual clarity and makes the receipt easier to scan. Adequate spacing between items reduces confusion and enhances the document’s professionalism.
Use consistent alignment. Align the text neatly to either the left or center for a polished appearance. Misaligned text can make the receipt look chaotic and unorganized.
Incorporate branding subtly. A small logo or company name at the top can help reinforce the business’s identity without overwhelming the design. Keep the colors neutral, and avoid flashy backgrounds.
Consider adding a thank-you note. A short message at the bottom shows appreciation and leaves a positive impression, adding a personal touch without overwhelming the formality of the receipt.
- Example: “Thank you for choosing our service!”
Test the readability of the receipt. Print it out or display it on various devices to ensure it remains clear and professional in all formats. Adjust margins, font sizes, or spacing where needed to maintain readability.
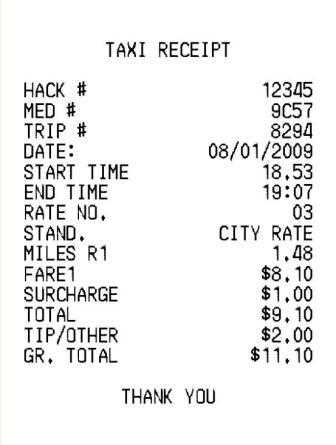
Including Necessary Information in Each Receipt
Ensure each receipt includes the taxi company name, address, and contact details. This provides a clear point of reference for the customer and offers a way to reach out in case of inquiries or issues. Also, include the date and time of the ride, as this is essential for tracking the trip and verifying payment records.
Clearly list the fare details, such as the base fare, additional charges (if any), and the total amount paid. This helps customers understand how the final price is calculated. A breakdown of the route or distance traveled can also add transparency, especially in case of disputes.
Include a unique receipt number for tracking purposes, which will be helpful for both customers and company records. Don’t forget to print the payment method (cash, credit card, etc.) on the receipt to clarify the transaction details.
If applicable, include tax information, especially if the region requires tax reporting on services like taxi rides. This ensures compliance and helps maintain accurate financial records for both parties.
Lastly, add any legal disclaimers or important notices, such as terms of service or refund policies, to keep everything clear and avoid misunderstandings in the future.
How to Organize and Store the Receipt Book
Store your receipt book in a clean, dry, and secure location to maintain its condition. Choose a designated space that is easily accessible for daily use, yet protected from moisture, dirt, or extreme temperatures.
Use Dividers and Folders

Organize your receipts by date, category, or customer. Use dividers or folders to separate different sections for quick access. For instance, categorize by week or month for easy tracking.
Track Usage Regularly
Review the receipt book frequently to ensure that it is being used properly and consistently. Regular checks can help prevent missing receipts and maintain an accurate record for your business or personal use.
| Method | Description |
|---|---|
| Labeling | Clearly label each section to identify different categories or time periods. This will simplify searching through receipts later. |
| Storage Box | Store the receipt book in a sturdy, labeled box or drawer for extra protection and organization. |
| Digital Backup | Consider scanning important receipts or using a digital backup system for easy access and long-term storage. |
Benefits of Using a Digital Receipt Book Template
Switching to a digital receipt book template simplifies your record-keeping. It provides a clear, organized way to store and access receipts, reducing paper clutter in the long run.
Speed and Convenience
Creating and sending receipts becomes faster with a digital template. Whether you’re in the car or at the office, receipts are generated instantly with just a few clicks. The process is straightforward and minimizes time spent on administrative tasks.
Improved Accuracy
With a digital receipt book, you minimize human error. Each receipt is automatically formatted, and you can easily double-check details before finalizing them. This precision ensures you avoid mistakes that can lead to confusion or compliance issues later.
Another advantage is that you can store and search through receipts quickly, which helps when handling financial audits or tax filing. Plus, they are easily retrievable and safe from damage, unlike paper records that can fade or tear.