To create a cash receipt template in Word, open a new document and start by setting up a simple layout that includes key details like the receipt title, date, payer information, amount received, and the purpose of the payment. Use clear sections to separate this information, making it easy to read and understand.
Begin with a bold heading at the top, such as “Cash Receipt”, followed by the date and the receipt number for tracking purposes. Under these, create fields for the payer’s name and contact details to make the receipt more formal and useful for both parties. It’s also helpful to include a brief description of the transaction, specifying what the payment is for, such as “payment for services” or “product purchase.”
Next, format a section for the amount received. You can use a table or bold text for the total sum to make it stand out. Finally, add a space for both parties’ signatures to acknowledge the receipt of funds. This section ensures the document serves as proof of the transaction.
To finish, adjust your margins, font, and spacing to make sure the document looks professional. Save your template, and you can reuse it anytime you need to generate a cash receipt quickly.
How to Create a Cash Receipt Template in Word

Open a new document in Microsoft Word and set up your page by adjusting margins and layout. Use the standard page size (A4 or Letter) and select “Portrait” for the orientation.
Begin by creating a header. Add your business name, address, and contact details at the top of the page. You can also include your logo if desired. Make sure the text is aligned properly and looks professional. Use a larger font for the business name to make it stand out.
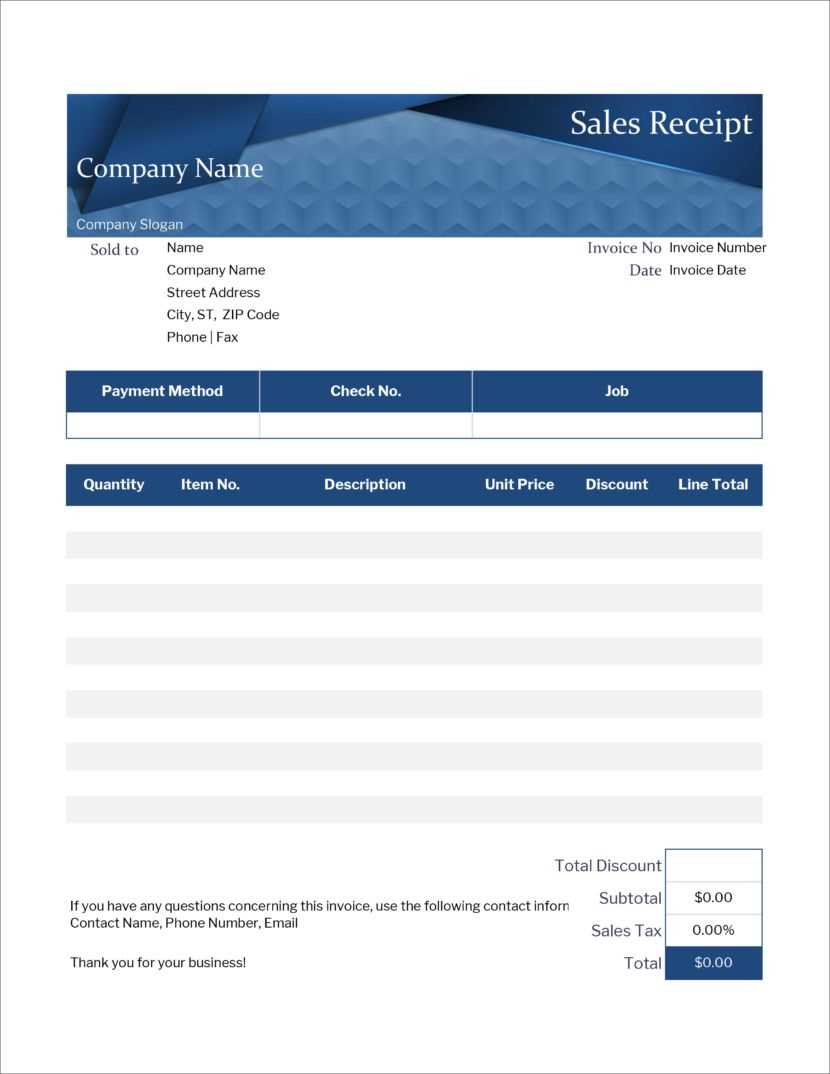
Next, insert a table with two or three columns. The first column should be used for item descriptions or categories, the second for amounts, and the third for any notes or additional information. This table will organize the details of the receipt, making it clear and readable.
Include the following fields in your receipt:
- Receipt Number: A unique identifier for the transaction.
- Date: The date the payment was made.
- Payer’s Name: The person or company making the payment.
- Payment Amount: The amount paid by the payer.
- Description of Goods or Services: A brief description of what was paid for.
- Payment Method: Indicate whether the payment was made by cash, cheque, or card.
For clarity, adjust the font size for each section. Bold the labels (e.g., “Receipt Number”) to help them stand out. You can also add borders to the table to separate different sections visually.
Add a footer with terms and conditions, return policies, or any other relevant information. Ensure the text is small but readable, and make use of the same alignment and spacing as in the header for consistency.
Finally, save your template. If you need to use it frequently, save it as a template file (.dotx) so you can easily create new receipts without starting from scratch.
Step 1: Set Up Basic Layout and Structure in Word
Begin by opening a new blank document in Word. Set the page layout to “Portrait” for standard receipts, unless you prefer a landscape format. Adjust the margins to a narrower setting (around 0.5 inches) to make the most of the available space while keeping it neat.
Next, divide the document into sections. Use tables for precise alignment of text, ensuring clarity and easy editing. A basic structure might include columns for the date, receipt number, seller and buyer information, item description, quantity, price, and total cost. A table with two columns is a good starting point–one for labels (e.g., “Date,” “Amount”) and one for values (e.g., “MM/DD/YYYY,” “100”).
For clarity, add headings for each section (such as “Seller Information,” “Buyer Information,” and “Transaction Details”). You can make these headings bold or underlined for emphasis. Keep font size consistent, typically using 11 or 12 pt, with a clear, readable font like Arial or Times New Roman.
Leave space at the top of the document for your company logo or title (“Receipt” or “Cash Receipt”). You can center this header and adjust its size to fit your preferred design style. Ensure the table cells remain clear of borders, so the text stays aligned, but consider using light shading in alternating rows to improve readability.
This basic structure will serve as the foundation for your cash receipt template, allowing for easy adjustments and updates in future uses.
Step 2: Add Key Information Fields to Your Template

Focus on including the core details that should be present in any cash receipt. This ensures clarity and helps both you and the recipient keep accurate records. Here are the fields you need to add:
- Date: Add a field for the transaction date. This is critical for tracking and reference purposes.
- Receipt Number: Include a unique identifier for each receipt to help organize and differentiate them. This could be a simple sequential number or a more complex alphanumeric code.
- Payer’s Name: Include space for the person or entity making the payment. This helps confirm who made the transaction.
- Amount Paid: Clearly indicate the exact amount received, including the currency if necessary. This avoids any confusion later on.
- Payment Method: Specify how the payment was made, such as cash, check, credit card, or bank transfer.
- Item or Service Description: Include a brief description of the goods or services for which payment was made. This helps with record-keeping and verifying the transaction.
- Signature Line: Provide space for both the payer and the payee to sign. This confirms the agreement and authenticity of the transaction.
Position these fields logically on the page, making sure they are easy to locate. Organizing them neatly will ensure the template is both functional and user-friendly.
Step 3: Customize Design and Format for Clear Presentation

Adjust the layout to enhance readability and structure. Choose a clean font, such as Arial or Calibri, to maintain clarity. Set the font size to 12 or 14 points to ensure that all information is easy to read. Avoid using too many different fonts or font sizes, as this can make the receipt look cluttered.
Use Tables for Organized Layout

Incorporate a table to separate key information such as the item description, quantity, unit price, and total amount. This will keep your receipt organized and allow for quick reference. Ensure the table has borders for a clear division between rows and columns. Leave enough space between the rows to prevent the information from appearing cramped.
Highlight Key Information

Make important details stand out. Bold the title, company name, or the total amount due for easy identification. Use subtle shading or underlining for headings like “Date” and “Invoice Number.” Be sure to balance these enhancements so the receipt looks professional without being overwhelming.
Lastly, adjust margins to give the content room to breathe. Avoid having text too close to the edges of the page. Set the margins to 1 inch on all sides for a clean and professional appearance.